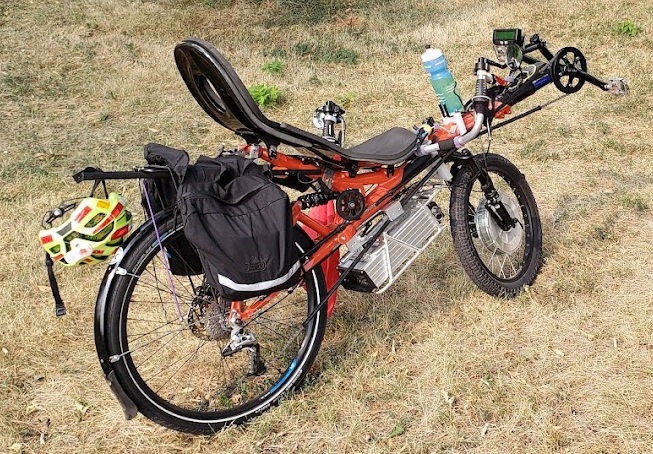
This bike will be the host machine for the e-components originally tested on the eG20 bike The main difference between the Bacchetta G20 and the HP Velotechnik StreetMachine is that the latter has a full suspension, which will make it substantially safer at speeds over 15MPH on poorer quality surfaces. It will also be more comfortable. The under-seat-steering (USS) also provides a better view of the road ahead. This bike is really the culmination of my estimated 60,000 miles on various human-powered land-based vehicles ("bikes"). Our shared german heritage is coincidental. The e-version of Stella hit the road in June, 2021 and provided a very tesla-like experience. I think this is a keeper.
| HP Velotechnik StreetMachine GTe 2019 model | |
|---|---|
| Battery Rack | Notes and photos about the custom battery rack made for Stella. |
| Cockpit | Design for brakes, throttles, CA display and other information and control components. |
| Headrest | The optional, custom seat-mounted headreast made for Stella. |
| Luggage Rack | Custom cantilevered luggage rack mounted to the seat support frame tube. |
| Photos | Miscellaneous photos of Stella |
| Trip Stats | Sample data used to determine performance, including speeds and battery range. |
| Workstand | Stella doesn't fit 'normal' bike work stands - nor the 'recumbent' work stand I made. |
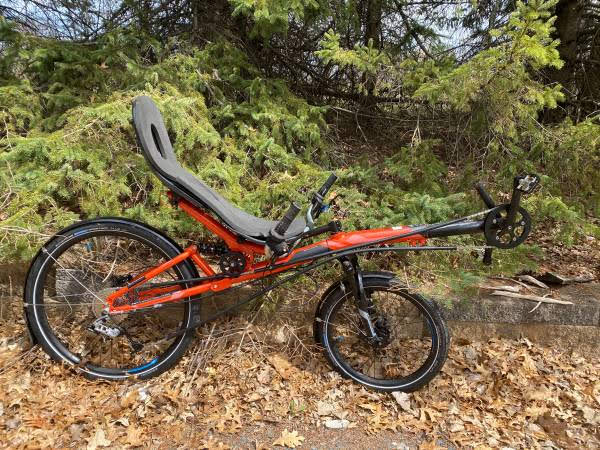
Craigslist photo taken by the bike's original owner, near Stillwater, MN. He bought the bike in 2019 from The Hostel Shoppe, a well-known recumbent dealer located in WI. The bike had about 20 miles 'on the clock' when my spouse got it for me as a birthday present. Thanks Debbie, IDYA!
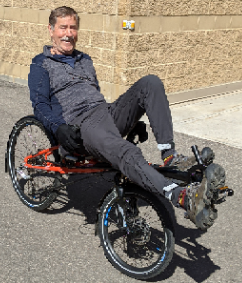
HJ on "Stella" after bringing her home, May 2020.
First 'double-digit' ride. The view from Stella, pulled up at 38th and Chicago, Minneapolis. 1 June 2020. Notice the completely unobstructed forward view while reclining comfortably on the StreetMachine's seat.

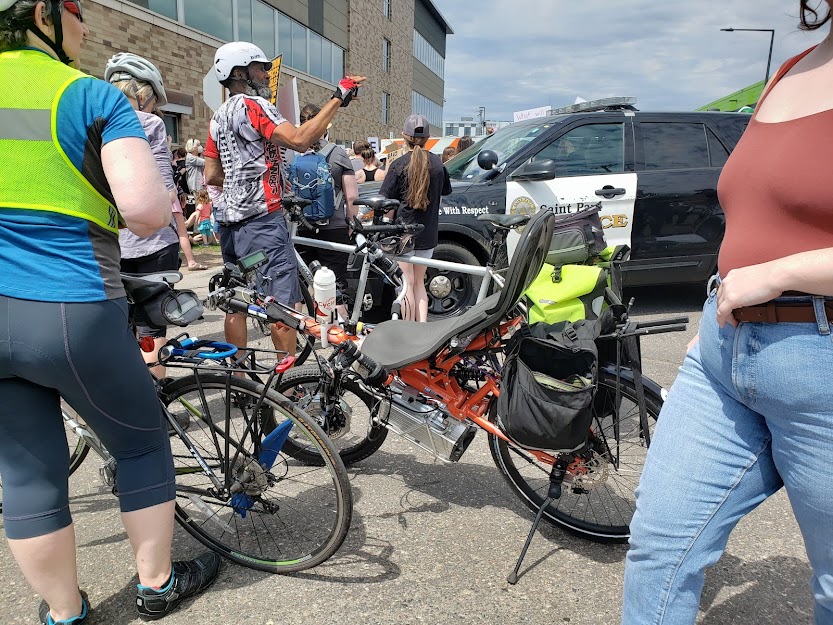
Turns out that Stella likes political rallies. Here she is attending a Planned Parenthood event in Saint Paul (Charles and Vandalia St) on May 14, 2022, nearly two years after the above rally. It's not the 60's anymore, but it seems we still have some issues out there.
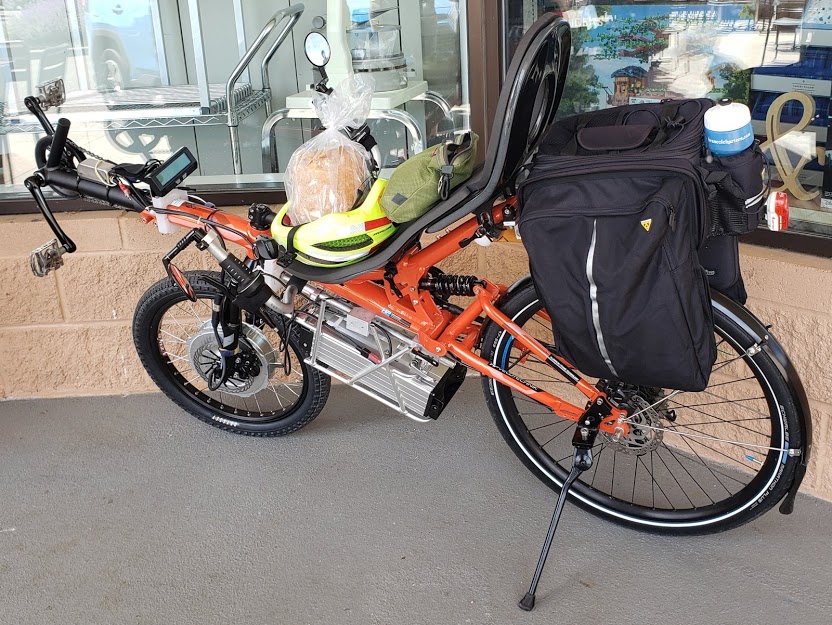
First 'double-digit' (shakedown) ride with electric assist: 20 mile roundtrip at 17MPH moving average. This is Stella pulled up at Rustica in Minneapolis, just off the Midtown Greenway, 3 June 2021. That's a sourdough-olive loaf of bread on the StreetMachine's seat.
Who says that e-bikes aren't a good thing? A wine-beer run to Thomas Liquors on Grand Ave.
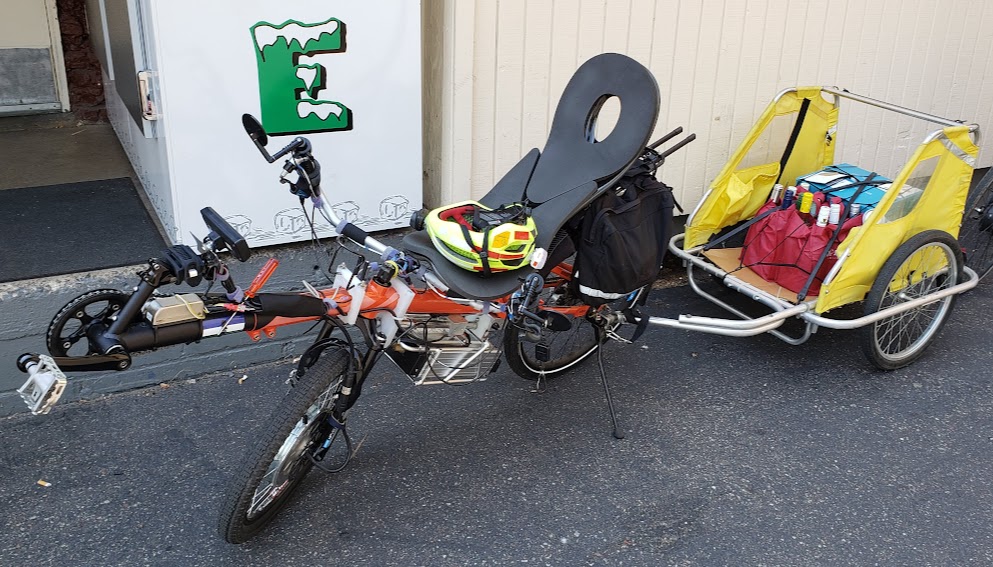
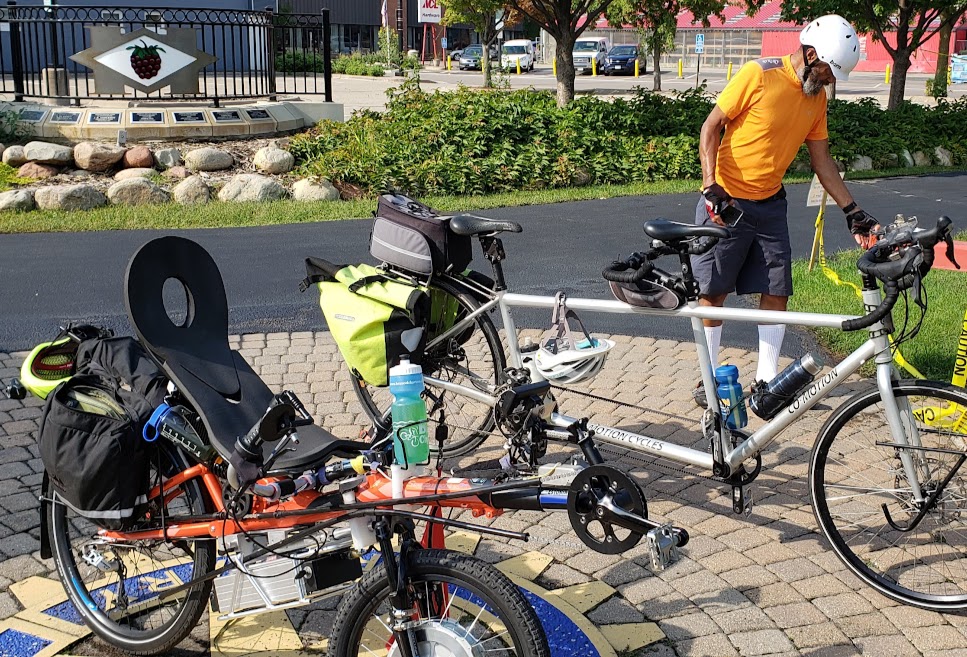
Gorgeous late summer OUST("Our Usual Saturday Thing") outing. We're doing a short stop in Hopkins, MN, USA, the Raspberry Capital of the World. Our fearless leader Seph is checking for the presence of water in the fountain.
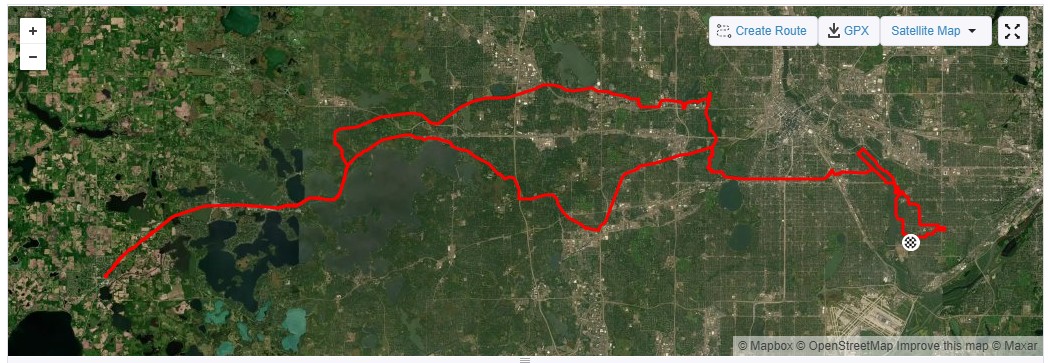
Satellite map (screen shot only, buttons inactive!) of round trip from home to St. Boni Bistro on 4 Sep 2021 (see 79 mile trip stats below). The extra miles are due to my brainfart of being on the east (wrong) side of the Mississippi for the start of the ride. I went a bridge too far -- see map detail below.
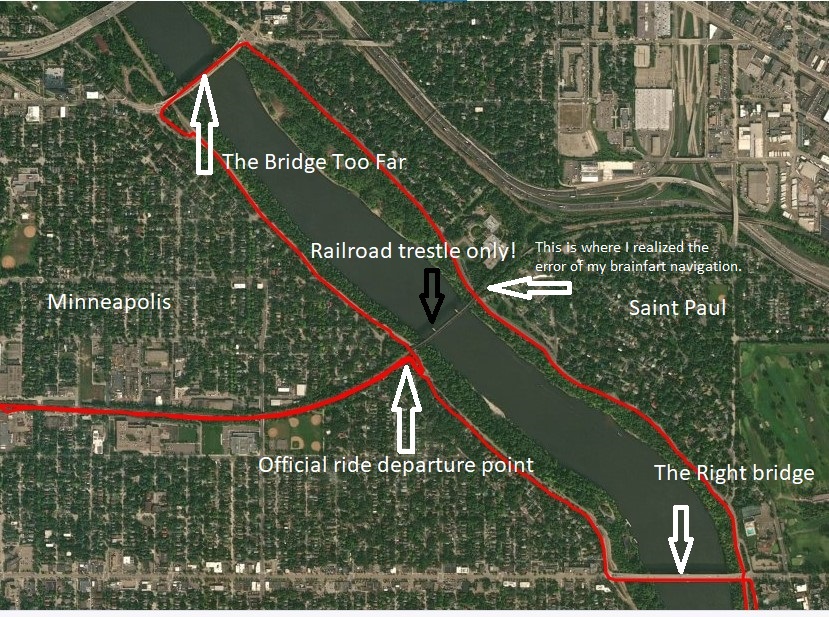
A closer look at my bridge fiasco. It was at the east side of the railroad trestle that I discovered I was on the wrong side of the Great Old River to make the official time and place of our ride's departure point. Since I hate to backtrack whenever I make a navigation mistake, it was easy enough to pick the next bridge upriver and then go back downriver. The group, who had been advised of my spatial error, left without me, with an invitation to catch them if I could. Fortunately, the Grin motor allowed me to catch up with the peloton while climbing up the Martin Olaf Sabo Bridge over Hiawatha. Apologies to Sharon for neglecting to see her while whizzing by!
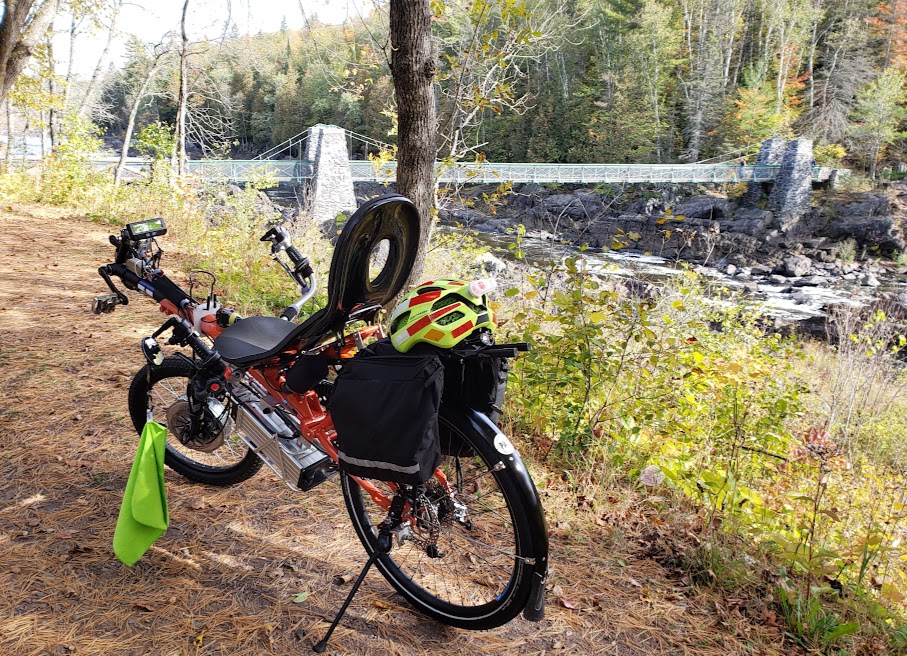
Stella at another bridge: an early October day (2021) ride to Jay Cooke State Park (near Duluth, MN) for an outdoor picnic.
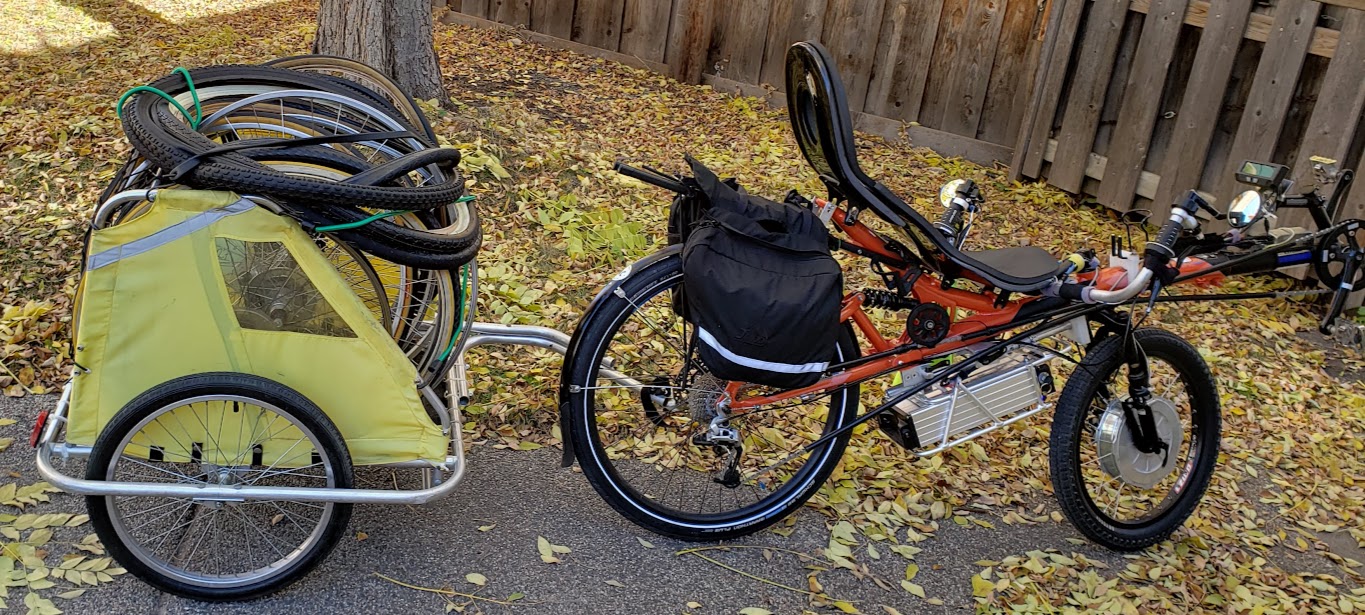
The "Rim Recycle Run" to Express Bike Shop, a local (Saint Paul, MN) do-gooder outfit that makes it much easier to keep bikes on the road and out of the landfill.
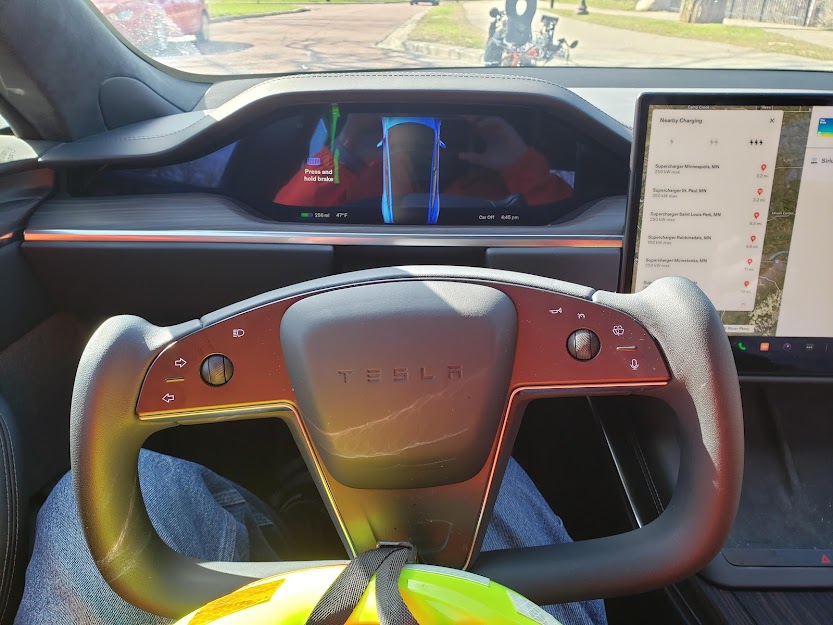
Stella on West River Road seen through Scotty's new 'refreshed' Model S with the yoke steering wheel. He bladed and I biked on a cold day in April, 2022.
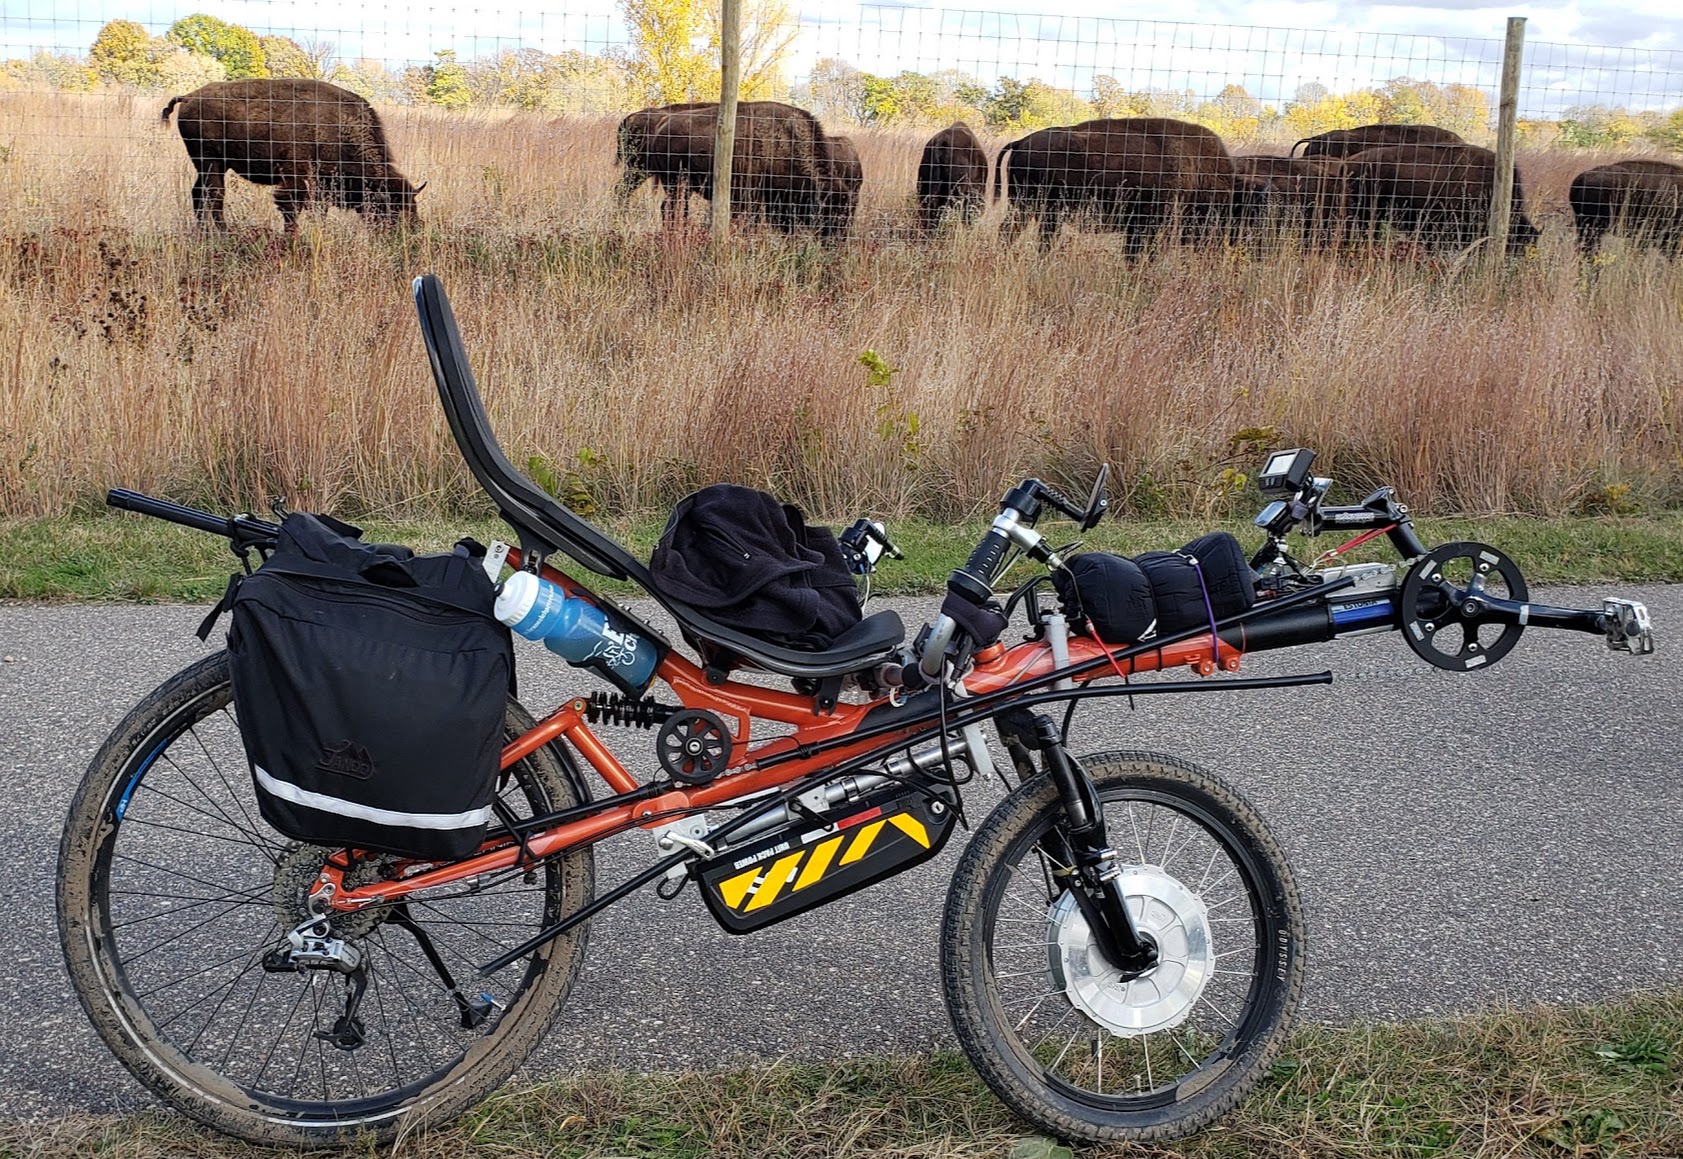
Stella doing a bison stop on the way down to Hastings (MN) from St Paul. These are being bred by the state of Minnesota to go back into the wild. They are not the same as "buffaloes," which favor somewhat warmer climates.
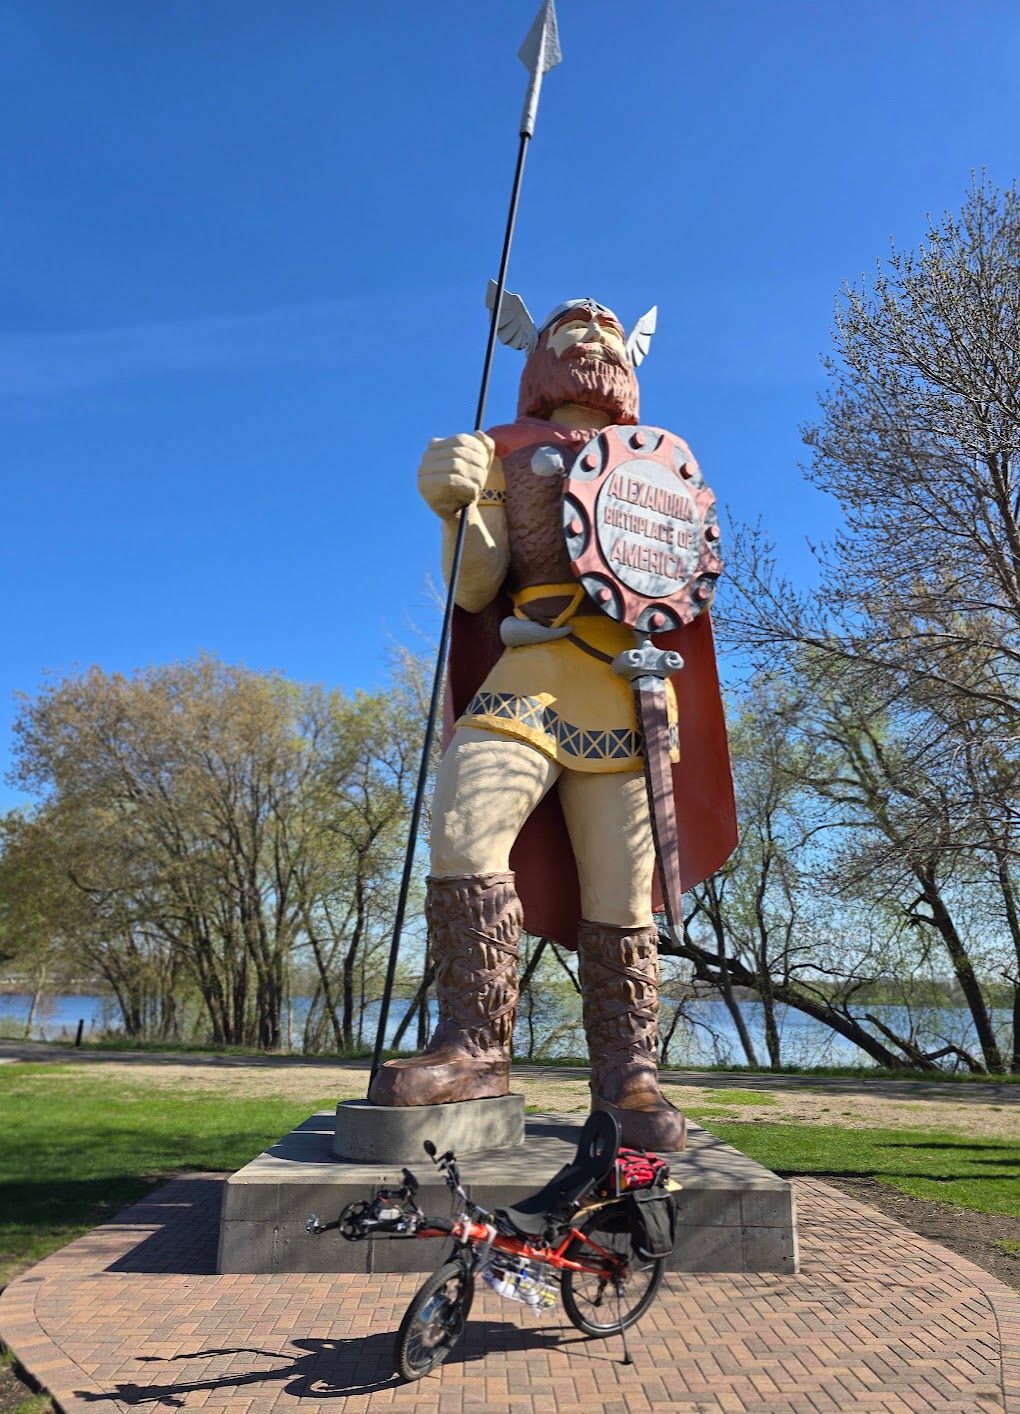
Stella in front of the "Birthplace of America," based on the Viking Runestone claim. Alexandria, Minnesota, May 2025.
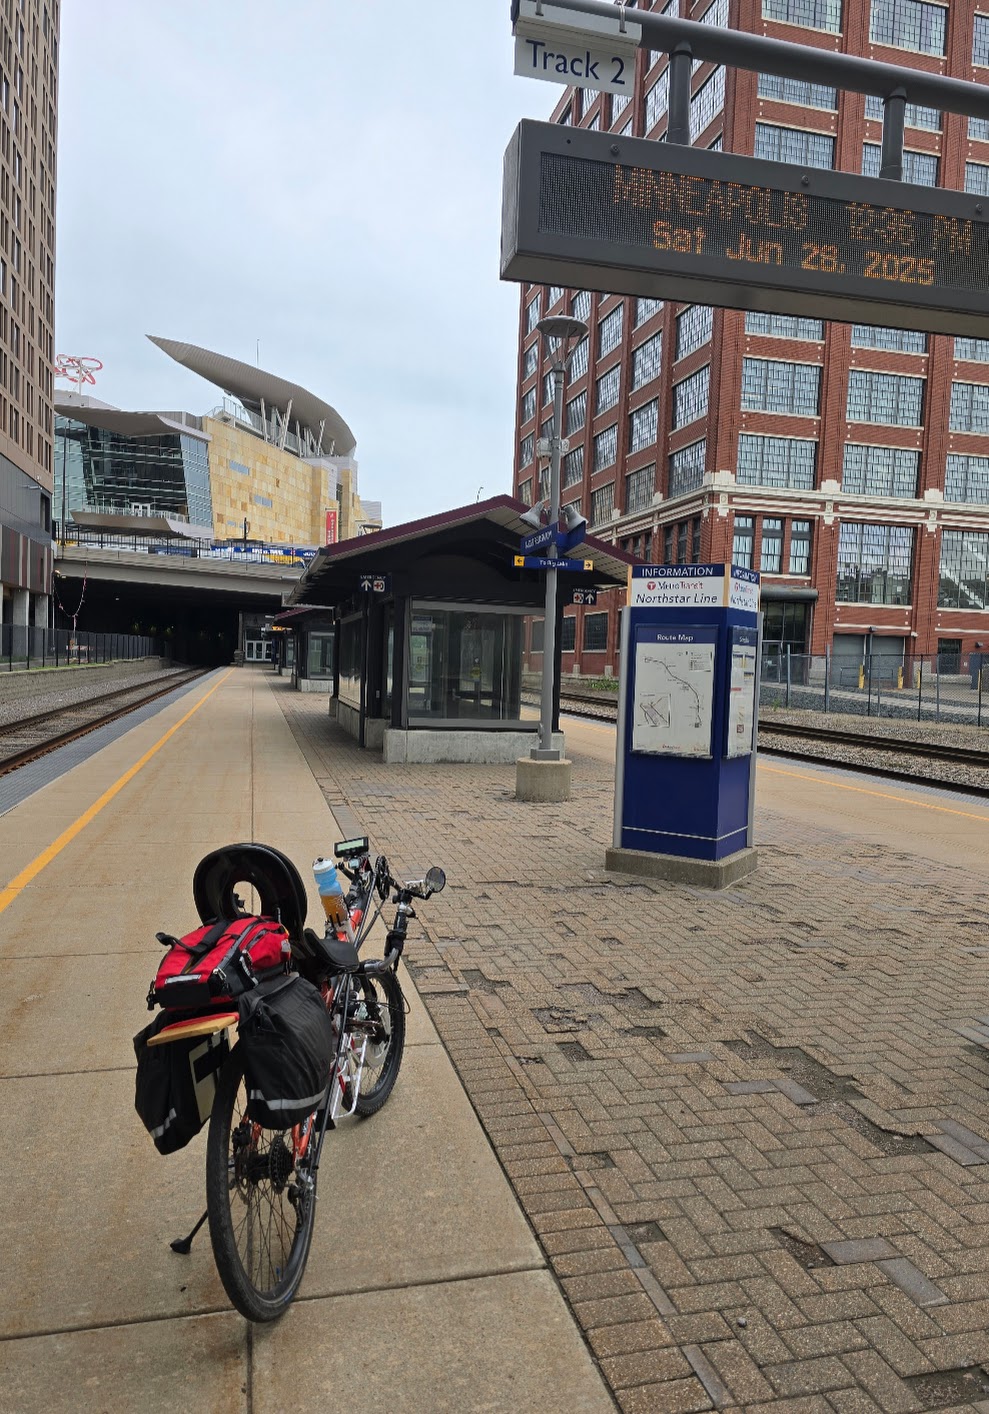
Stella all alone at a dead railroad station, Minneapolis, Minnesota, June 2025.
This location was very difficult to get to, since a chainlink fence and a railroad track
separated the actual bike path (at the very far left of the photo) from the 'dead'
platform. I did not lift the bike over any fence.
Return to Top of Page Return to Main Menu
Note that this is really a continuation of Trip Stats begun with the electric version of the Bacchetta G20, which used a very similar set of components. See http://erowbike.com/eG20#trip_stats for the comparison.
The following are selected sample trip stats to describe the performance of this combination of bike, motor, controller, batteries, and other control systems. One thing we've learned from using lithium ion battery packs (4.2V/cell fully charged) is that when the per cell voltage drops to about 3.43, the pack is essentially empty. The typical 13S/48V pack will be unable to put out more than about 100 watts, which won't be enough for climbing any hills.
The link to this part of the page is: https://erowbike.com/eStreetMachine#stella_trip_stats
| Dist miles |
Time hr:min |
Speed Max/Avg |
Amps Min/Max |
Regen % |
Temp C Max/Avg |
WattHrs Used Total/Mile |
WattHrs In Charge/Effic % |
Battery Voltage |
Notes & Misc. |
|---|---|---|---|---|---|---|---|---|---|
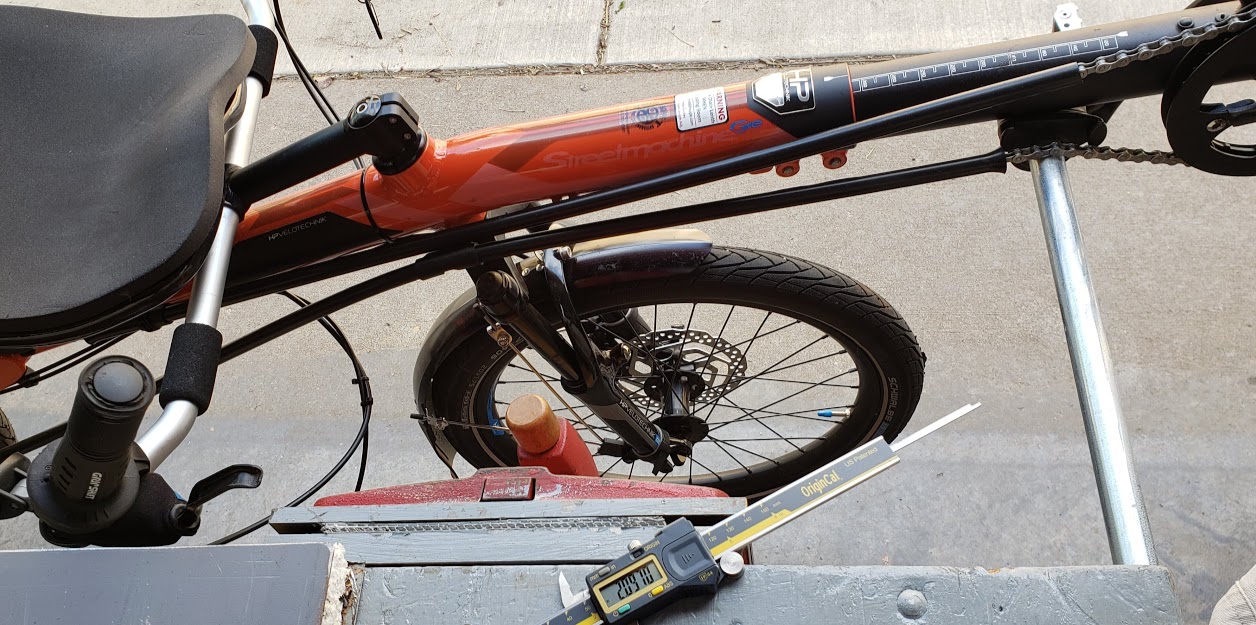
| 33.4 | 3 | 36/11 | -15.4/29.5 | 11.6 | 53/42 | 307.6/8.37 | 370/83 | 14S | 12 Jun 2021: First OUST ride for Stella. This Odyssee front tire wheel setting is actually a few mm low (33.4GPS vs 33.011CA). Forward 5.8Ah - Regen .6Ah == 5.2Ah net. Used 56% battery (9/16 internal pixels) per pictograph, @52V remaining. Parker 52V battery used, IR=0.169Ohms. Recharge of 370 watt hours, 58.8V (4.2V/cell) HOC with factory charger. |
| 16 | 1.25 | 30/11 | -15/29 | 21 | 50/38 | 162.5/8.5 | 190/86 | 14S | OUST ride with DAS, RT to Van Cleve/Dinkytown, conservative riding; Used 1/4 of battery capacity (4/16 pixels), @55.3V; lots of regen on hills and slowing. Est. Parker battery capacity: 550 watt hours/61 miles@9WHrs/Mi. |
| 27.5 | 2:15 | 29.5/12 | -11.6/29.5 | 15.7 | 46/39 | 229/7.1 | 280/82 | 14S (Parker) | Two rides: get bread from Rose and RT to Bootstrap Coffee; used 7 pixels (9 left); @177mO IR; |
| 20.23 | 2:01 | 36/10 | -9/29 | 30.6 | 43/37 | 153.4/5.8 | 190/81 | 14S (Parker) | Mixed ride; used net 117 watt hours (4 pixels) for 20 miles at 5.8 WHrs/mi, regen 47 WHrs (30.6%)! following DAS 10 miles, following Paul on OneWheel next 10; |
| 60.8 | 4:04 | 29.3/12.5 | -15.5/29 | 11.2 | 40/35 | 450.5/6.85 | 540/83 | 14S (Parker) | Round-trip to WI; used 69% of battery: (7.8 Ah, 11 pixels, 5 left [4, then 5])-this means total capacity is est. @653 WattHrs; at 6.8 WattHrs/Mi this gives a 96 theoretical max range for this bike/battery/rider combo; 175mOhms IR @EOR; [if we used 75% of battery used, we'd get smaller max range]; had 16% regen @30miles - arrival in Stillwater, 234 WattHrs, 6.2 WattHrs/Mi; 7 pixels used; |
| 79.24 (GPS) | 6:20 | 27/12.2 | -11/29 | 12.5 | 39/? | 508/5.8 | 14S/52 Parker battery | 4 Sep 2021 RT to St Boni; CA had 77.75 mi indicated, so wheel circumference still too low; min V 44.9V; three pixels left (bottom row) @49.8V; 8.8 (10.6 to LVC, 47.5 resting V) AHrs used; over 1AHr regen! Had low of 5.5WHrs/Mi 63 miles in; I used up the last 3 pixels in the bottom row to end up at 595 WattHrs used before the "V" icon started flashing on the CA, signalling LVC. | |
| 33.8 | 2:52 | 32.8/11.8 | -14.7/29.4 | 11.2 | 33/31 | 302/8 | 400/76 | 14S/52 Parker battery | RT from Boulder Jct WI to Sayner, 3 Oct 2021. Elev gain 787'. Used 9/16 pixels, @51.9/3.7 voltage. |
| 58 | 4:32 | 29/12.6 | -15/29.4 | 9.4 | 22.8/20 | 495/7.9 | 610/81 | 14S/52 Parker battery | RT to Stillwater to escort SolarEbike to departure point; 2 pixels left (49.6V/3.54-cell; ~100wHrs). Temp 32F (freezing) at 9AM, battery power reduced. |
| 17.2 | 1:12 | 33.5/14.1 | -15.4/29.4 | 11.6 | 34.7/34.2 | 208/10.8 | 250/83 | 14S/52 Parker battery | Nov 9, 2021 - shirt sleeve weather (60F), Extra Extra Credit jaunt with Seph to take advantage of last 'summer' day of 2021. Used 7 of 16 pixels on CA. |
| 34 | 2:29 | 31.8/13.6 | -15.5/29.5 | 11.5 | 20/24.5 | 461/12.2 | 590/78 | 14S/52 Parker battery | 9 Apr 2022; freezing temps at beginning of ride; 2-3 pixels left (49.8Vpack/3.56Vc) at end of trip, so definitely cold weather influence; 0.265 ohms IR at end of ride; |
| 29 | 2:31 | 34/11 | -12/29 | 19.9 | 30/28.6 | 205/5.8 | 14S/52 Parker battery | 4 Jun 2022. First ride after Black Hills group ride, happy to be back on paved trails. I used 6 of 16 pixels. Just short of 1K feet of climbing - going up the High Bridge @ about 6mph in granny gear and not much assist -- for the memories! 222 mOhms IR. | |
| 87 | 7:04* | 32.7/12.2 | -14.9/29.35 | 12 | 38/30 | 530/5.4 | 14S/52 Parker battery | *These stats cover three days of riding (Jun 18-20, 2022), one in city followed by two HOT rides on Root River Trail (SE MN). With 8.6 AHrs net (total forward 9.65, minus 1 regen AHr)/530 watt hours used, might have done all 3 days on one charge, with easy (flat) miles on paved trails. | |
| 52 | 3:52 | 35/13.5 | -14/29 | 8.3 | 48/36 | 525/9.2 | 52V, Parker | Aug. 13, 2022; RT to Smith Coffee in Eden Prairie; fair amount of miles on gravel trails. Inadvertently rode with 20lbs of pressure in nominal 80PSI front tire (was noticeably squirrely on some surfaces!). 10.5 (forward)/9.867 (net)amp hours. 1 pixel left, with resting voltage still at 48.4 volts (3.46V per cell). Battery at 224 mOhms IR. | |
| 19 | 1:47 | 20.3/10.6 | -7.4/28 | 17.2 | 125.2/5.6 | 52V/Parker | Oct 29, 2022; IR==292mOhms | ||
| 32.4 | 2:42 | 27.7/11.7 | -9.66/29.6 | 15.3 | 36/ | 212.4/5.7 | 52V/Parker | 4 May 2023; IR==207mOhms. Used 7 of 16 pixels. Vmin was 53.6; 3.83 volts per cell at end of trip. | |
| 44.1 | 3:49 | 34.3/12 | -14.5/29.2 | 15.7 | 42.7/ | 364.2/7.14 | 52V/Parker | 3 Jun 2023; IR==203mOhms. Used 10 of 16 pixels (62.5%); 1,307' elevation gain. | |
| 47.2 | 3:59 | 30/11.8 | -12/29.3 | 11.8 | 40/ | 367/6.9 | 52V/Parker | 15 Jul 2023; IR==214mOhms. | |
| 35.1 | 2:40 | 30.5/12.9 | -14.3/29.3 | 12.1 | 26.5/24 | 331/8.4 | 360/92 | 52V/Parker | 26 Aug 2023; mostly backward route around Lake Phalen; IR==238mOhms. All charging now done via 133VDC solar (3x bi-facials in series) into orig. (factory, unmodified) Parker 52V AC charging brick, normal cycle, max 2A charge current, to 58.8 HVC. |
| 35.4 | 2:48 | 28.9/12.5 | -15.4/29.43 | 10.6 | 31/ | 399.6/10.2 | 52V/Parker | 14 Oct 2023; one pixel left, 3.5V cell; IR==281mOhms | |
| 76.6 | 6:20 | 45.2/12 | -15/29.59 | 16.1 | -/12 | 592.4/6.7 | 52V/Hailong #1 | 21 Oct 2023; round-trip to downtown Hastings, along Mississippi -2,721 elevation gain. Using Hailong #1 (14S/52, DAS) 2 pixels left, cells @ 3.54V; IR==175mOhms. Charging done via 133VDC solar (3x bi-facials in series) into orig. (factory, unmodified) Hailong 52V AC charging brick, normal cycle, max 2A charge current, to 59V HVC. | |
| 31.5 | 2:25 | 31.3/12.9 | -15/29 | 11.1 | 35.9/32.8 | 398.1/11.4 | 48V/Luna Eclipse PJS | 18 Nov 2023; Amore; this is one of the first rides using the stock Luna Eclipse (folding bike) battery. IR at end of ride == 163mOhms; 4 pixels left - cold day and relatively hard ride. | |
| 56 | 4:46 | 31/11.7 | -15/29 | 6.2 | 34.7/31.9 | 505.76/8.5 | 48V/Luna Eclipse PJS | 3/4 May 2025; Alexandria, 2 days riding, begin 4.14 cell V; IR at end of ride == 165mOhms; 1 pixel left (3.49 cell voltage) - room temperature and easy riding. | |
| 26.1 | 1:34 | 37.4/16.7 | -15/29 | 5.8 | 42/40 | 458.7/16.6 | 5.8 AHrs used; 9 AHrs Satiator in to 54.6V | 48V/13S; Dual 'Lectric' rectangular packs connected in parallel. | 25 Jun 2025; begin with 10 mi run to Rustica (20mph/avg), then battling off-trail along the Northstar Line railroad tracks. IR at end of ride == 140mOhms - both packs in parallel; 2 pixels left (3.41 cell voltage, running on fumes) Not even 500 watt hours for both packs! |
| 43.5 | 3:15 | 34/13.3 | -15/29 | 8.4 | 35/37 | 496.3/10.5 | 48V/13S Lectric | Jul 18, 2025; test the 'new' Lectric 13S/48V battery individually; 0.160 ohms IR when empty | |
| 35 | 2:28 | 35/14.1 | -15/29 | 9.8 | 38/39 | 478.4/12.5 | 48V/13S; Eclipse PJS battery; 0.148 IR when empty | 2 Aug 2025; two separate trips for this one charge on this pack; | |
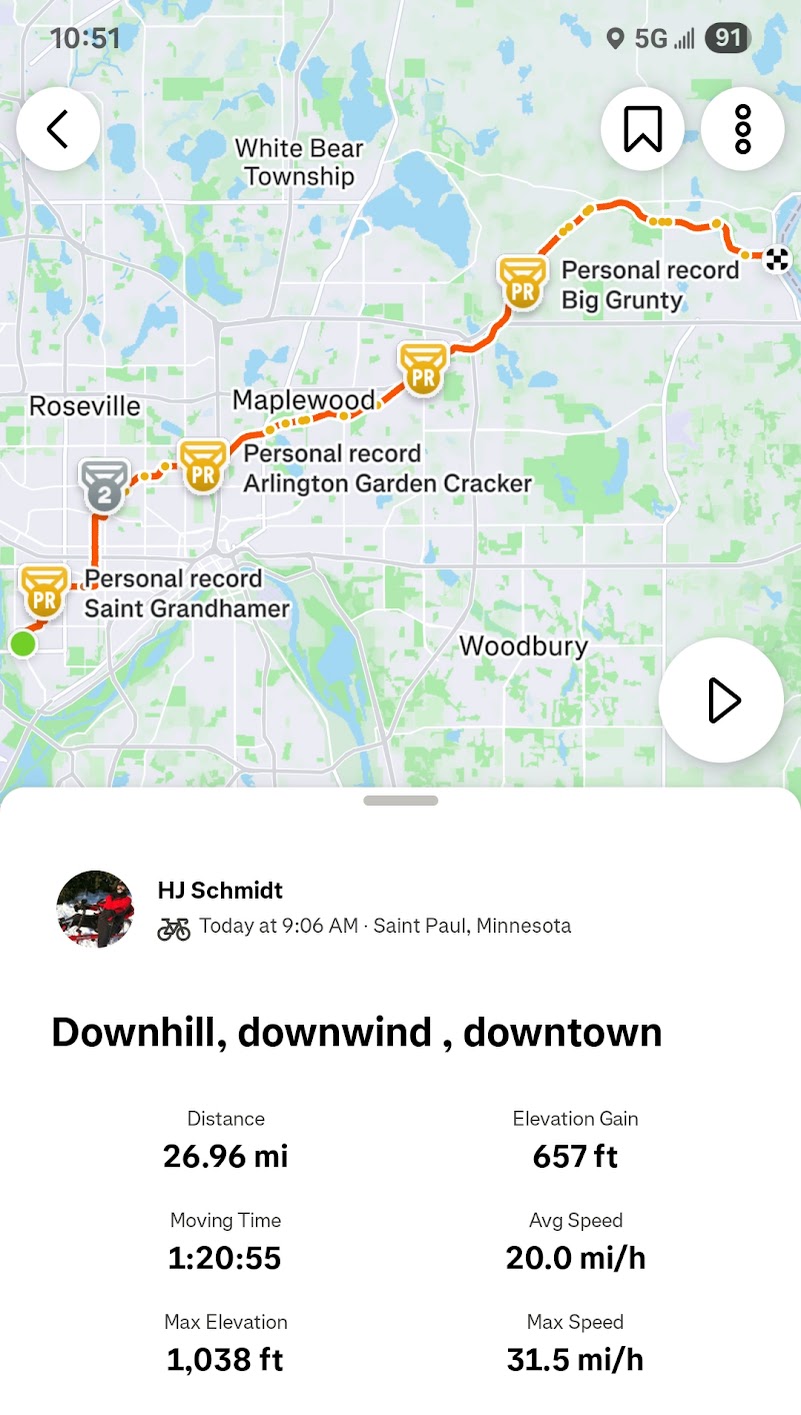
| 27.3 | 1:19 | 31.5/20.5 | -15/29 | 9.2 | 45/- | 493.4/16.6 | 48V/13S; Lektrik battery; 0.152 IR when empty | 4 Oct 2025; trip TO Stillwater, high speed run to run this pack dry (45.8V/3.53V, two pixels left); see Strava stats below. | |
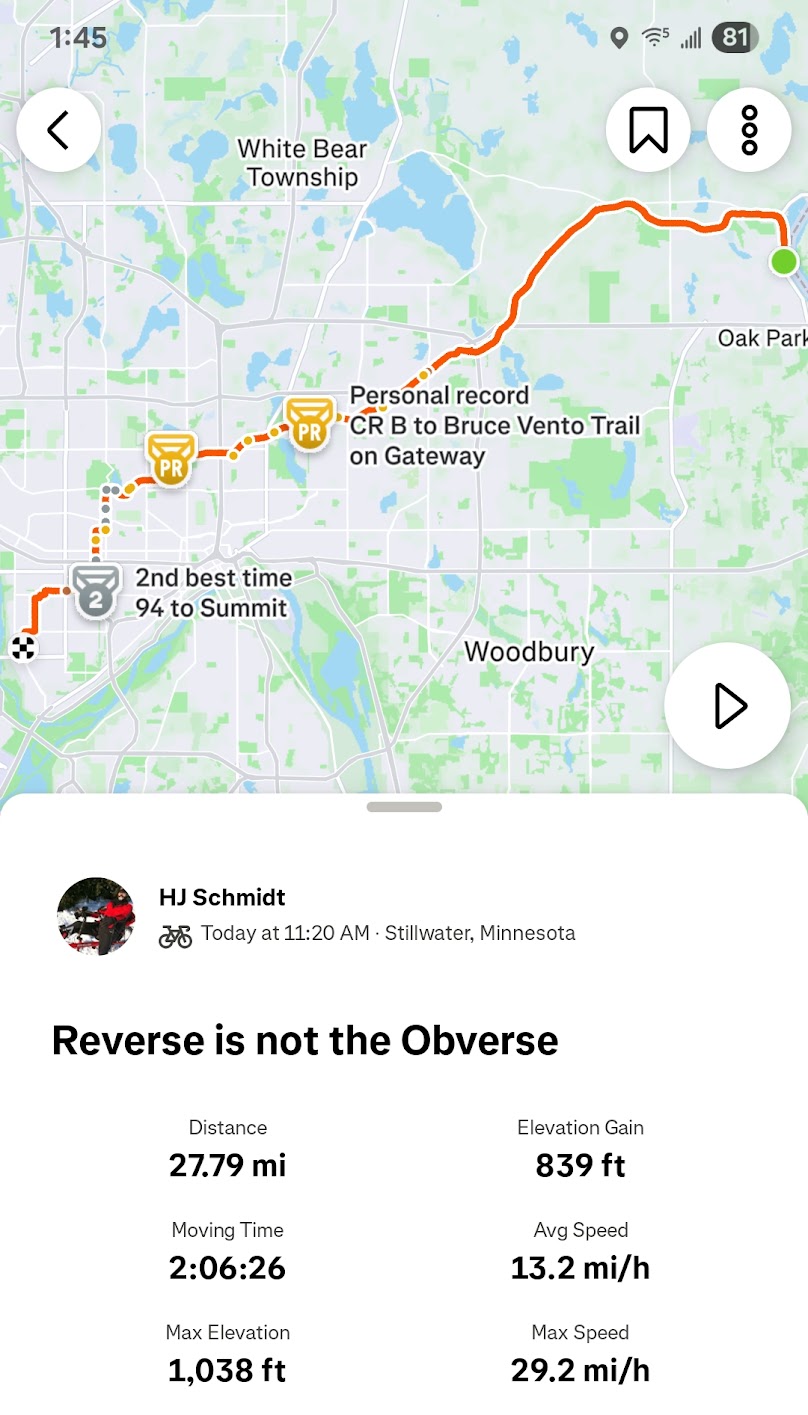
| 28 | 2:05 | 29/13.5 | -15/29 | 6.8 | 53/- | 402.4/13.4 | 48V/13S; Eclipse PJS battery; 0.136 IR when empty | 4 Oct 2025; trip FROM Stillwater: two parts: slow to Hadley with group, then run home, stiff headwind from south, last leg; (46.3V/3.56V, three pixels left) see Strava stats below. | |
| Dist miles |
Time hr:min |
Speed Max/Avg |
Amps Min/Max |
Regen % |
Temp C Max/Avg |
WattHrs Used Total/Mile |
WattHrs In Charge/Effic % |
Battery Voltage |
Notes & Misc. |
Based on numerous rides (and multiple uses to power our e-lawnmower) over at least two years, I've determined that the Parker battery has a 'maximum' rating of 595 Watt hours (just shy of .6 kWhrs). For planning purposes, it should be considered a 1/2 kWhr battery. At a max 29.5 amp draw, it will sag to a min 49.7 volts (3.55 V per cell).
The Luna "Eclipse PJS" battery is a nominal 0.5kWHr 48V/13S battery.
I also accquired a second battery of this type via Craigslist that was a spare from an "Lectric" ebike. This 'Lectric' battery is actually a bit stronger and is a "solid" 0.5kWHr battery pack.
The plan to use this with the Eclipse as a 'dual/parallel' pack battery for Stella didn't work well (see trip stats above), showing the dual pack (run in parallel), tested 28 Jun 2025, barely made it to 500 watt hours.
The CA shows only one pixel left in the dual-battery pack with the cell voltages between 3.46 and 3.49 volts.
Note that this reading when there is NO LOAD on the pack -- if the throttle were fully depressed this reading would be ~ 3.43 volts. At this cell voltage, the pack is basically empty.
![]()
Depending on how much 'resting time' the pack gets, the voltage with one pixel can be higher:
![]()
Strava stats for trip TO Stillwater, 4 Oct 2025. This was a solo leg.
Strava stats for trip FROM Stillwater, 4 Oct 2025. First part of return trip was with OUST group, who went to Hadley only.
Return to Top of Page Return to Main Menu
Photo of Stella's front boom on mockup workstand. The boom inner tube (black part) has a diameter of 2.097", and will be used as the main support for the front of the bike. It's a perfect fit for the rubber mounts from the old Seph/Les bike rack permanently seized onto their VW. These rubber mounts are designed to fit onto stock 1" (OD) pipe.
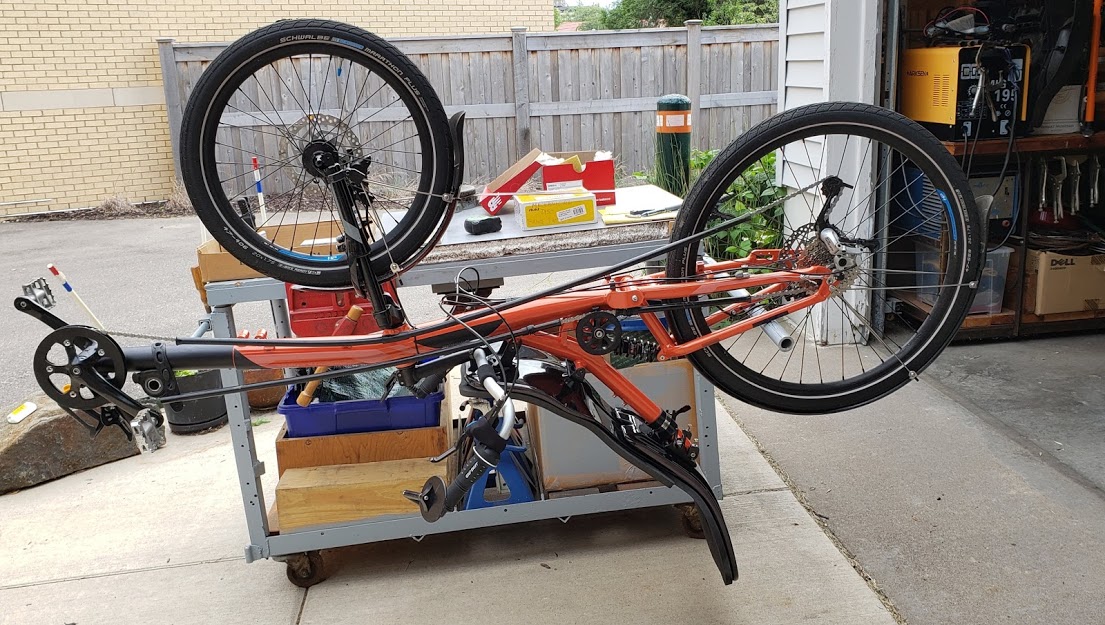
The rear part of Stella will be supported by a rear luggage rack cobbled together from parts I've scavenged previously from other bikes or Erik's dumpster. This photo shows the back end of the bike with no rack installed yet, supported by a rubber bumper holding the rear rim.

The rear components which equate to an upright bike's chainstays are aluminum tubes with a very slight taper, becoming smaller towards the rear axle. The top tubes vary from slightly more than 7/8" diameter to slightly less. If we were to use Jubilee clips as attachment points for the rear rack, the 7/8" spec would probably be about right. Remember that the chainstay assembly moves independently of the seat assembly (due to the rear suspension), so do not use fixed supports that tie the two together, as many traditional rear racks do.
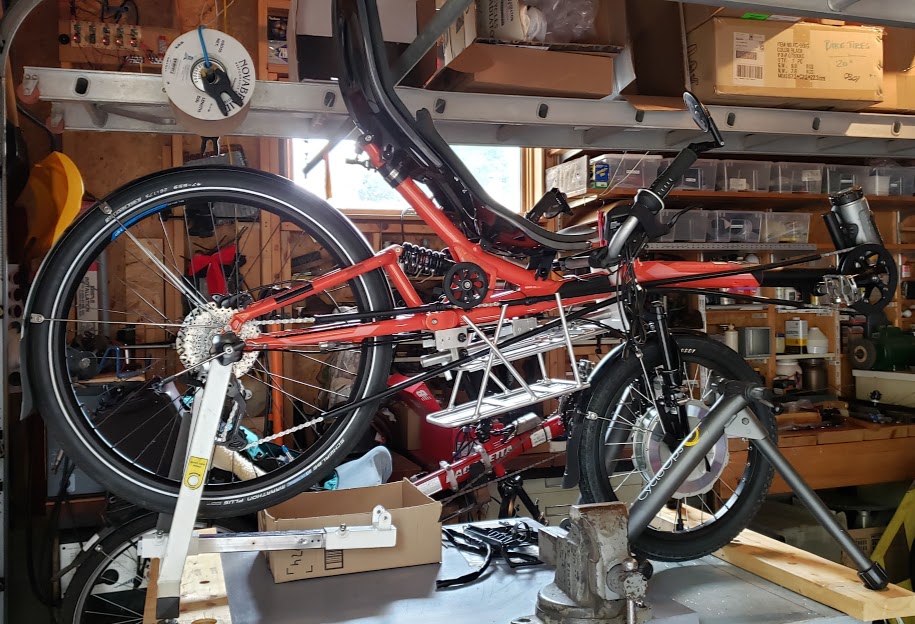
The first thing to do when working on the underside of the bike is to make sure your bike workstand will hold the bike upsdide down.
Yup, it does.
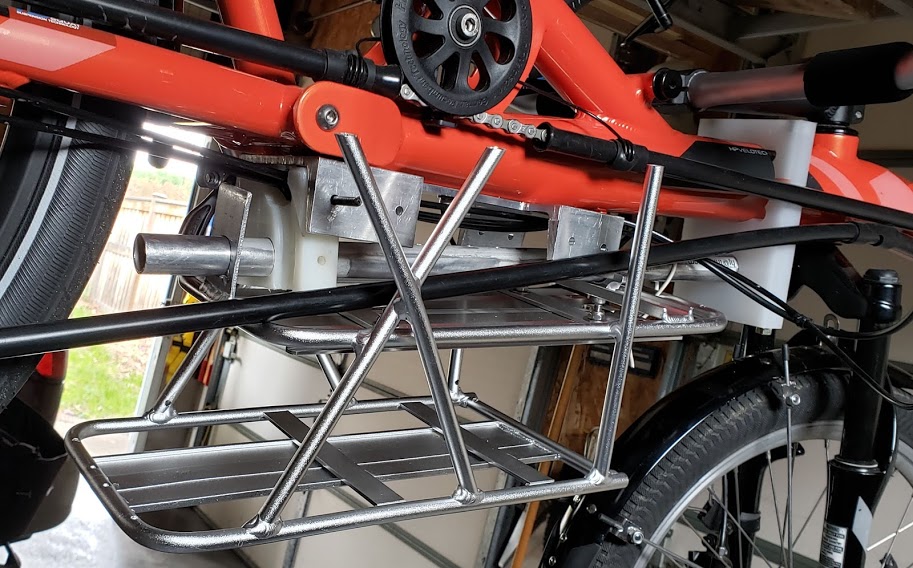
The following photo shows Stella on top of the rolling workbench to make it easier to work on the battery rack. The Parker rear rack is being test-fitted to hang underneath the bike, between the wheels.
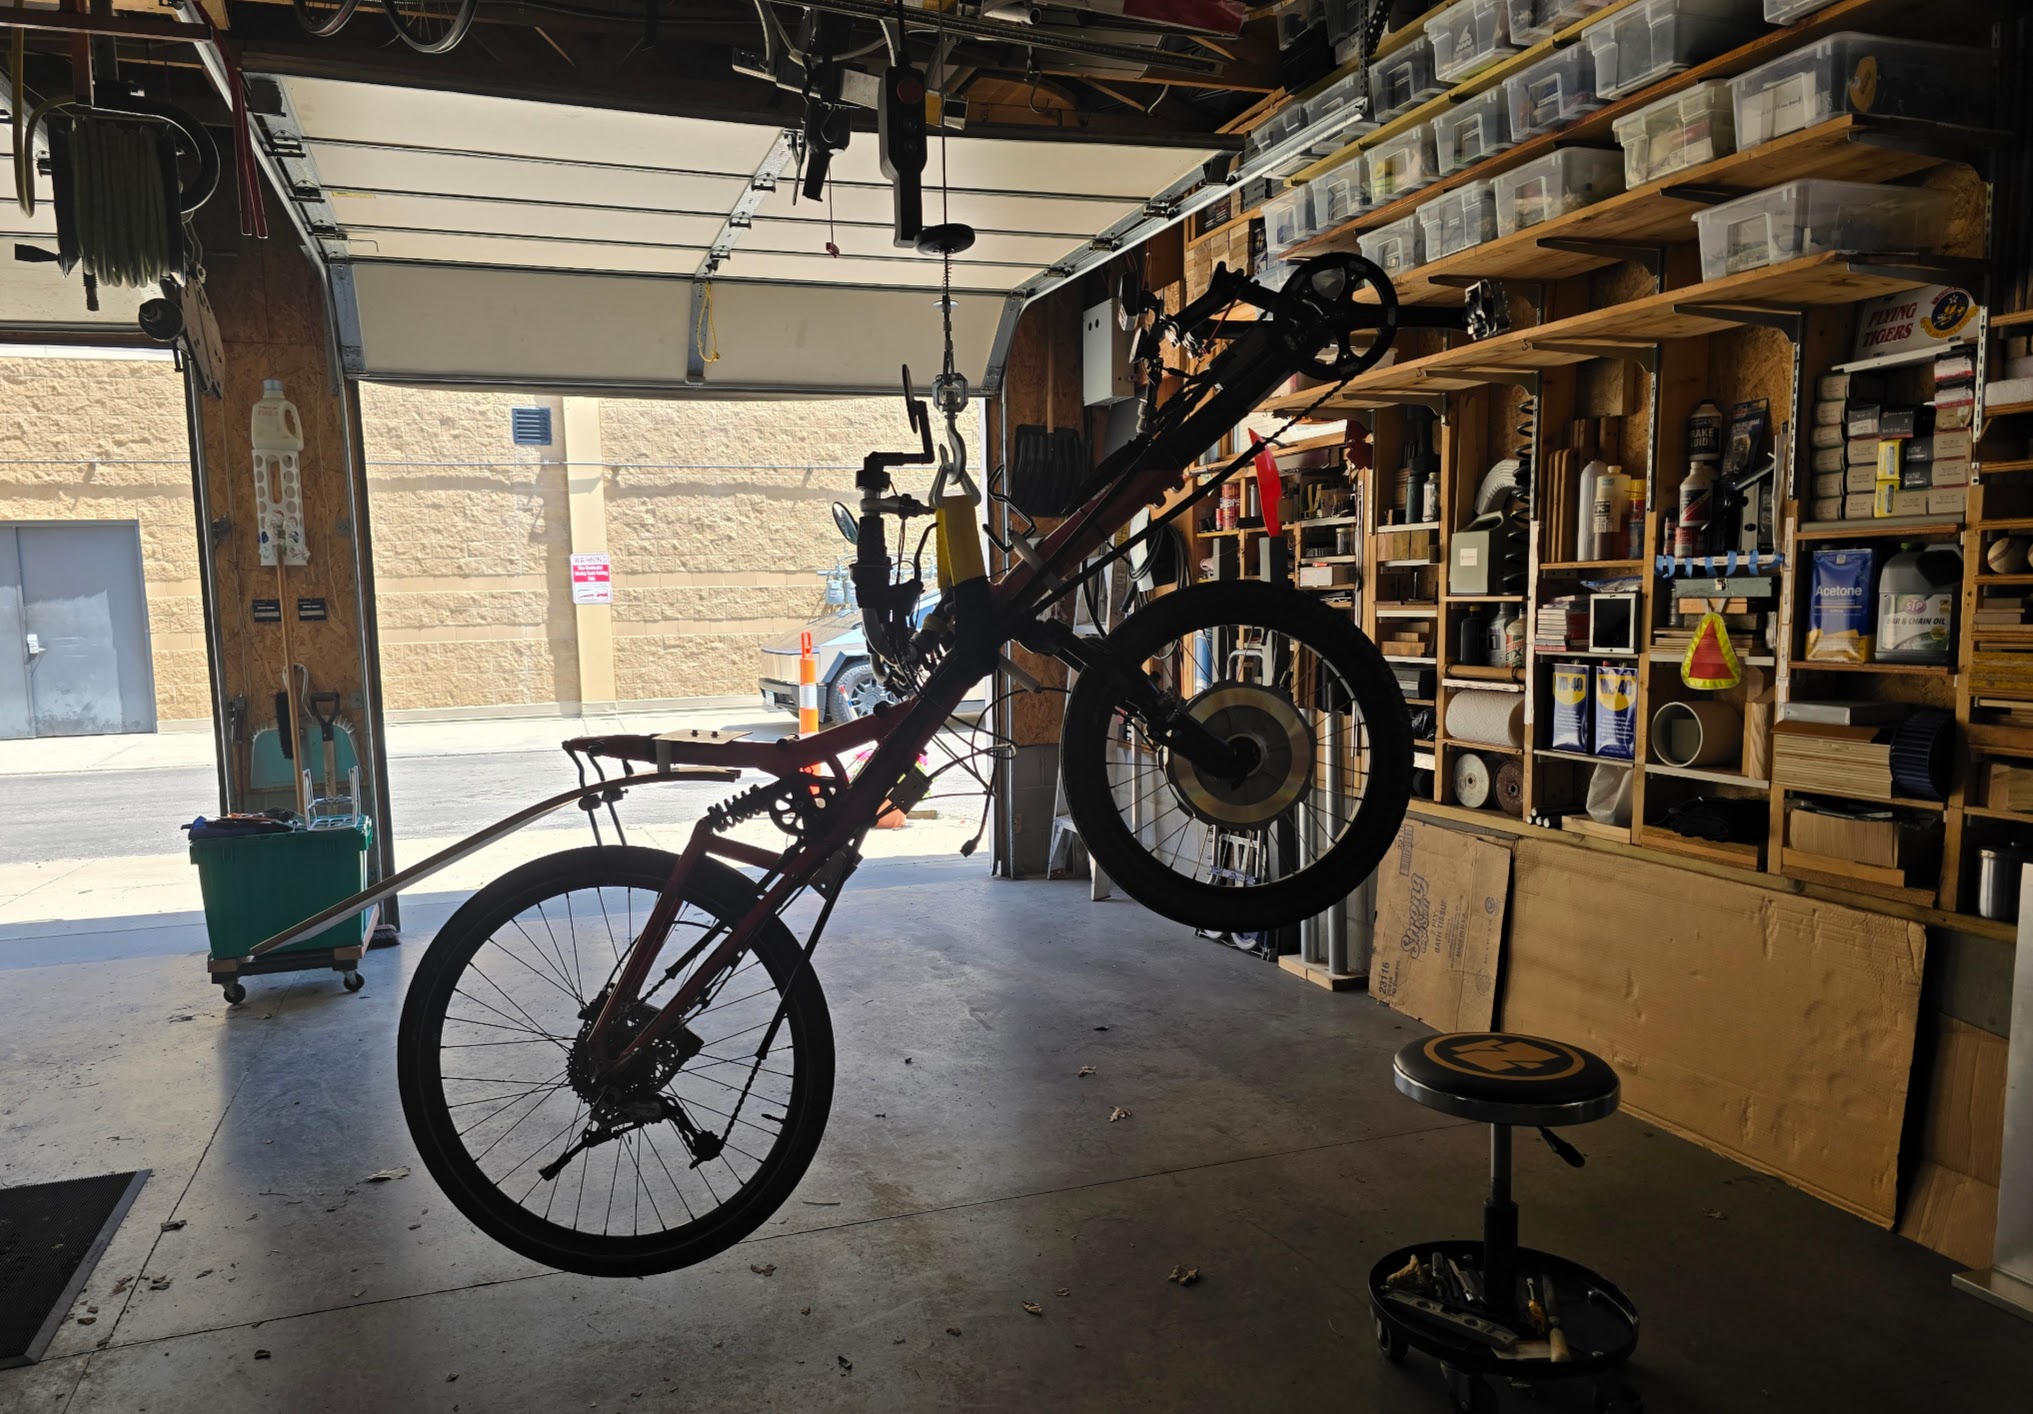
Maybe the easiest - simplest? - workstand for Stella? The advantage to this system is that it's the easiest to store
and doesn't require any bike or workbench *lifting*!
Return to Top of Page Return to Main Menu
Jun 2021: The headrest accessory is temporarily on hold due to the discovery that I have yet to discover a need for it -- at least not for rides up to 80 miles or so, and having the seat adjusted in the more upright position that I'm favoring.
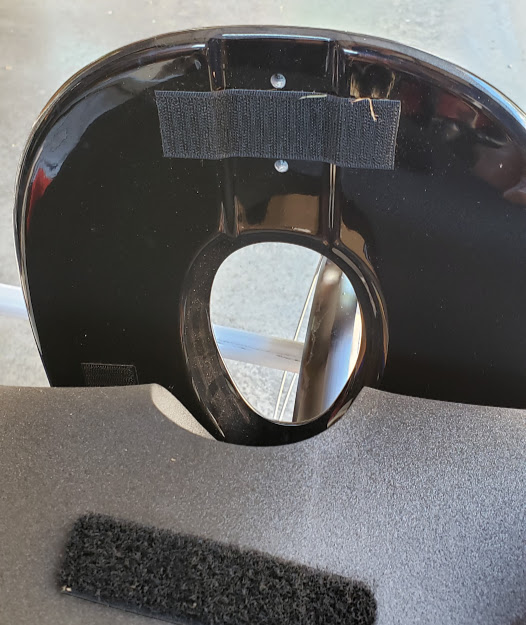
There are two threaded inserts for M? screws in the top center of the seatback. The inserts are located in a recessed channel, so any bolt heads or other parts used to fasten a headrest here would be hidden (and leveled) by the seat's foam cushion. The velcro holds the seat cusion to the seat itself. I'll use a sharp knife to remove the velcro in the actual channel, leaving two tabs, which will be adequate to keep the top of the foam cushion from flopping around.
I plan to modify the carbon fiber headreast I made for the G26 to fit in this channel and be adjustable with a limited amount of vertical movement. The idea is to have the headrest pad fit below the helmet, so it's actually a 'neckrest' instead. This has worked very well on the G26 with the laid-back seat, where it came in handy for the occasional need to rest on long trips.
Return to Top of Page Return to Main Menu
The design requirements for mounting the traction battery on Stella were primarily to have the load suspended from the sprung (shock absorbed) part of the frame and be low and centered between the wheels. We also wanted the battery to be easily swappable with any other non-proprietary battery that happened to be available. The bike itself would just have front and back attachment points for the 22 mm "rail" which will be the backbone of any given battery "pod". Also, the battery swap should not require any tools to accomplish. For this we use a slightly modified quick-release skewer to lock the battery pod in place on the bike.
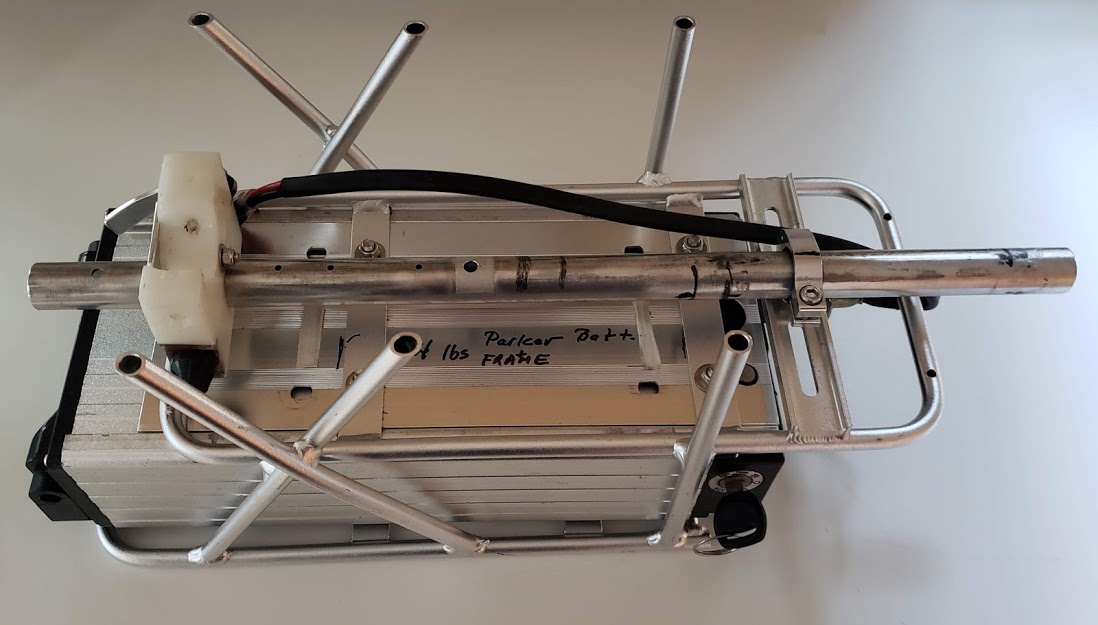
This is the first battery pod in regular use on Stella: the heavy duty aluminum case "Parker" battery slid into the original rear rack it came with. The total pod weight of about 14 pounds is split between the rack/rail at 2.5 pounds and the battery at 11.5 pounds. It's a 52V/12AHr (624 WHr) lipo battery in a 14SnnP configuration (haven't take it apart yet to confirm cell count and mfg/model code). My best guess is that the cells are probably Chinese and made 2018-19.
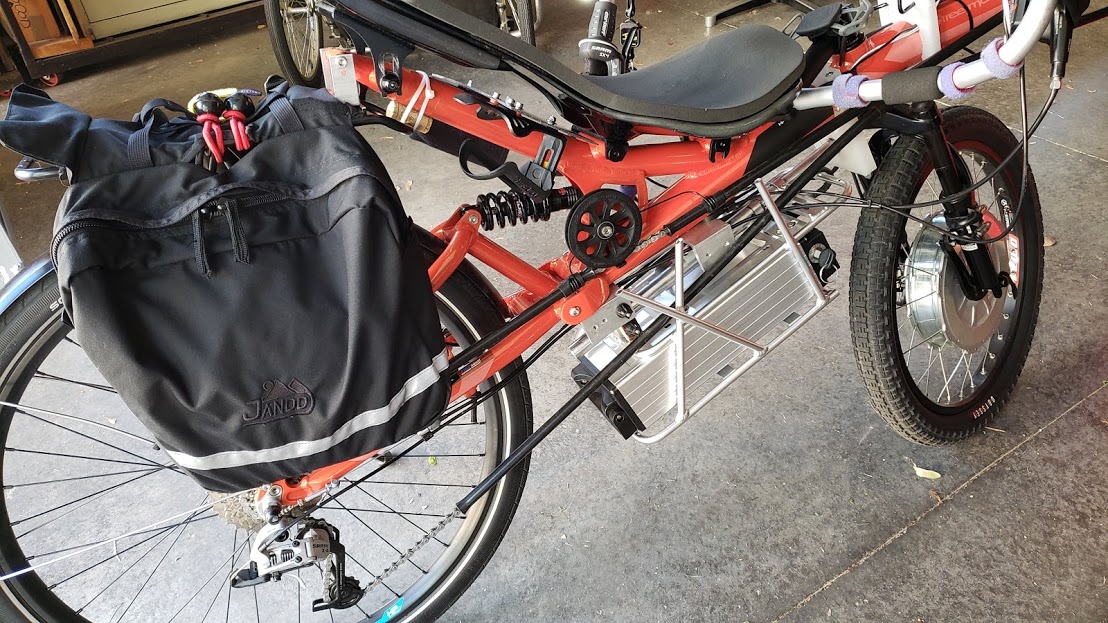
This is what it looks like when mounted on the bike:
A closer look, with the battery itself removed from the rack.
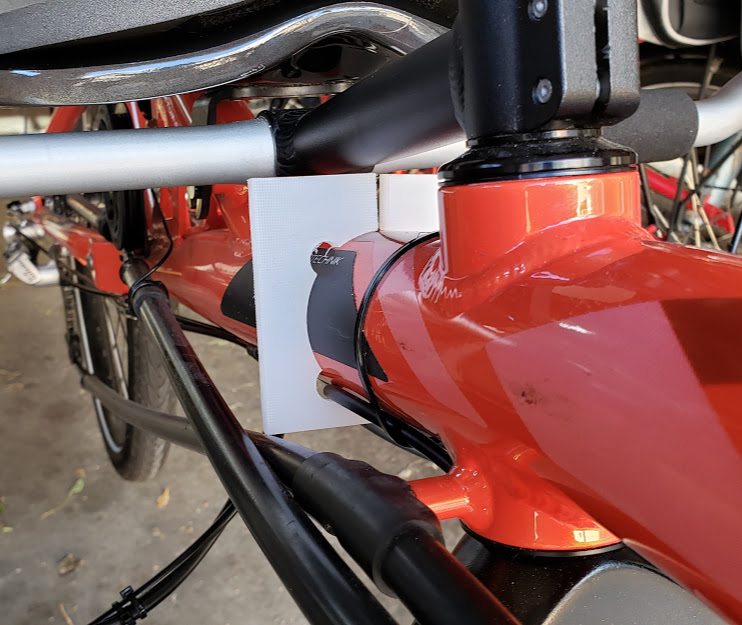
Looking at the right side of the main tube just behind the under-seat steering (USS) tube. The white plastic is a template model of the battery support clamp being made for this location. The top of the mounting bracket just clears the swinging steering 'handlebars'. I'll add a small rectangular notch to allow some clearance for the chain return tube, which shows just slight interference here. I designed the bracket with four symmetrically placed cable pass-throughs, only one of which may be needed, as seen here.
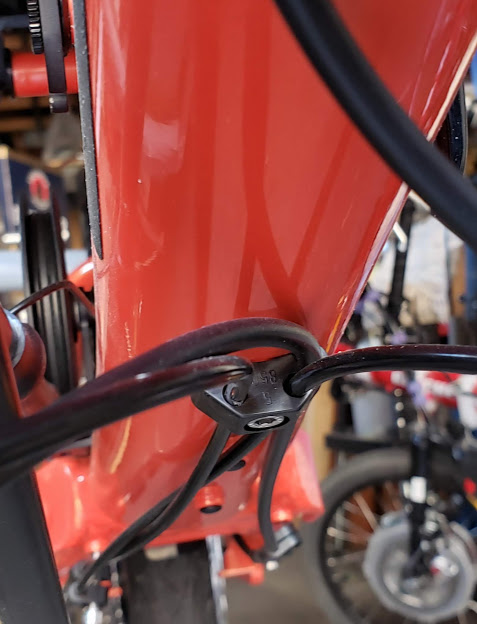
Underside of main tube near the middle, showing the black plastic bracket that holds several control cables going to the back of the bike. It is held to the tube with a single M5 bolt. The battery rail will have to work around these cables. It might make sense to divide them and re-attach them on the sides of the main tube.
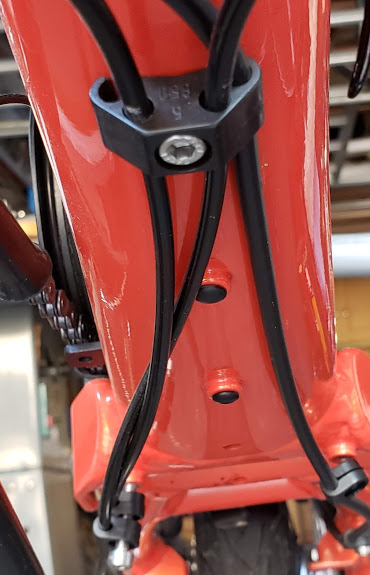
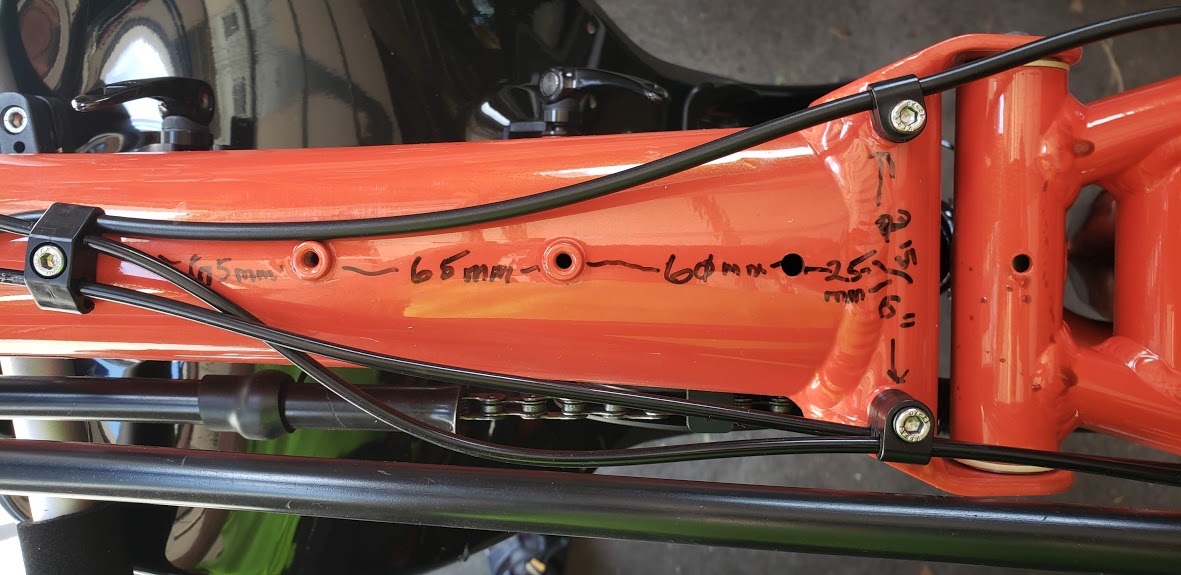
Going further on the bottom of the tube towards the rear of the bike. Note the two small black plugs which are protective covers for additional threaded mounts in the tube. Their spacing suggests they might be designed to hold a water bottle cage. Also note an unplugged holes in the main tube further back for drainage of any moisture that might accumulate in the tube.
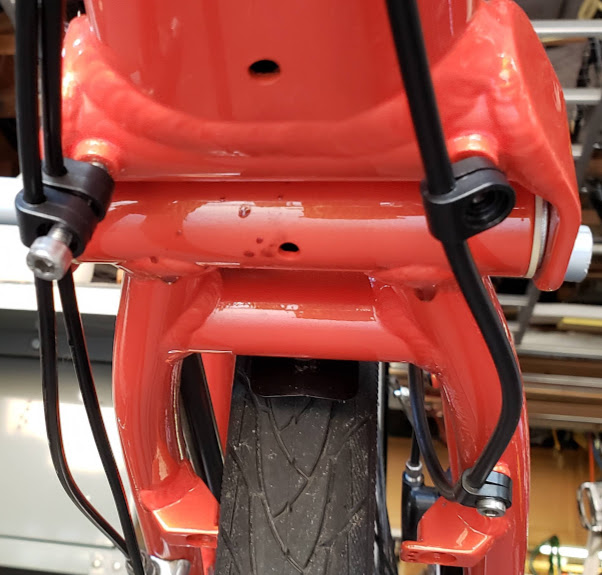
We're now looking at the very end of the main tube, bottom view, where it becomes the rear suspension joint. The drainage holes are now easier to see. I've loosened and removed the M5 screws used to hold the plastic cable bosses/mounts, which are on approximate 3"/75mm centers. These tube mounting points will be repurposed for supporting the rear of the battery rack.
To make it easier to get the right measurements and test the fit of new parts, it's best to mount the bike upside-down in the workstand. The following shows the spacing between the M5 screw mounting holes on the bikes bottom tube, with the rear of bike towards the right.
Here we're seeing if a scrap piece of 4" wide aluminum "U" bar stock can be turned into a rear support for the battery rack. There is an approximate 20" (max) of space available under the main tube, between the front and rear wheels. Towards the front, the need to maintain clearance between the rack and the front wheel's fender will be a major issue. Maintaining a smooth chainline is also a major consideration.
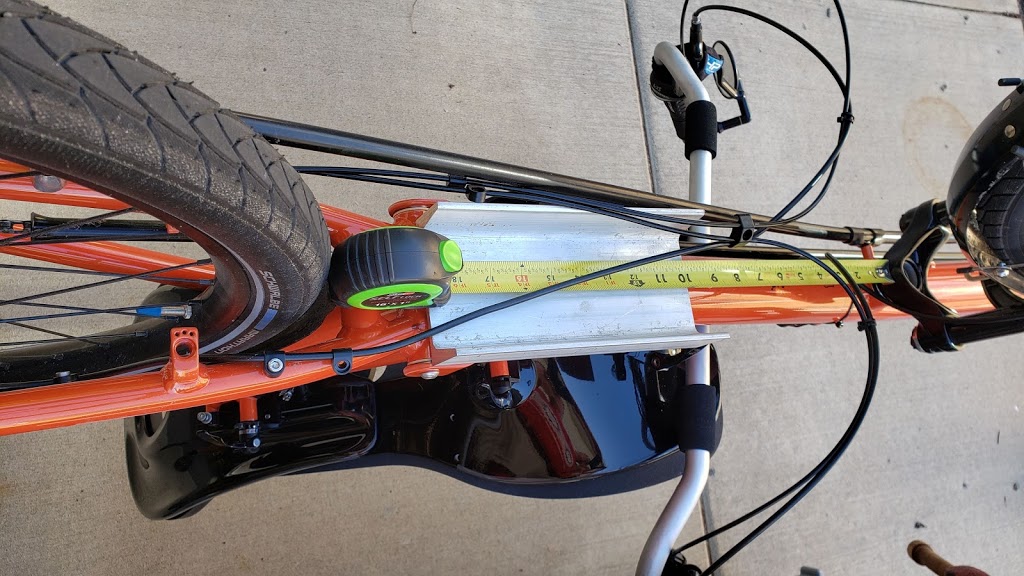
Here we see that the main tube starts curving slightly upward starting about 6 inches forward of the rear main suspension hinge. Since the rear mounting plate will be absolutely flat, we'll need to make a shim to go between the plate and the tube at the very forward bolt. The gap is approximately 4-5mm, including the height of the threaded boss.

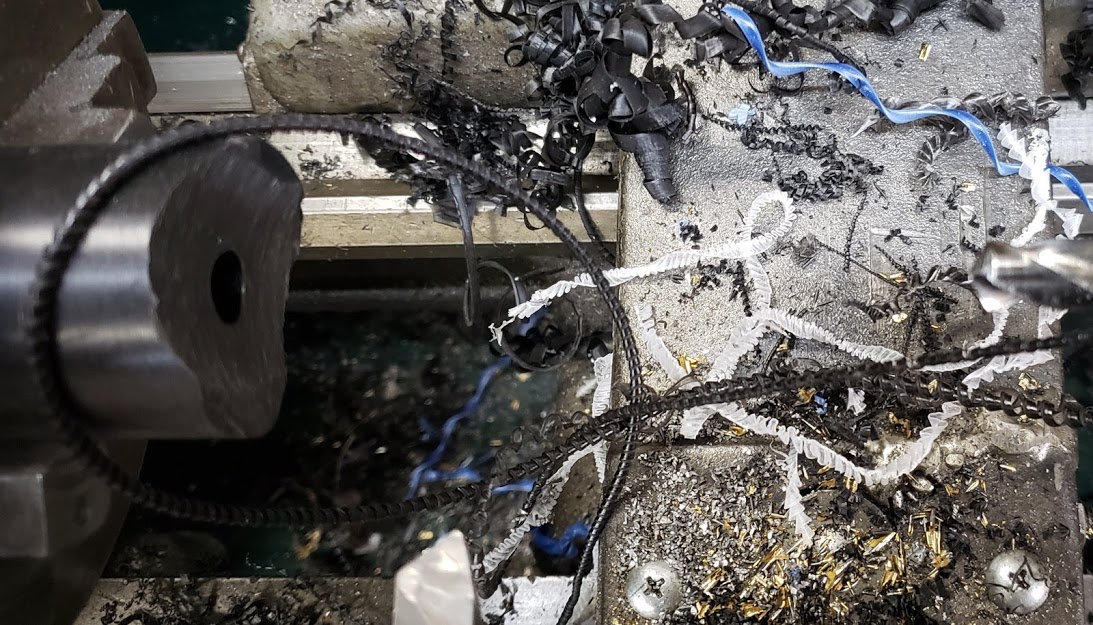
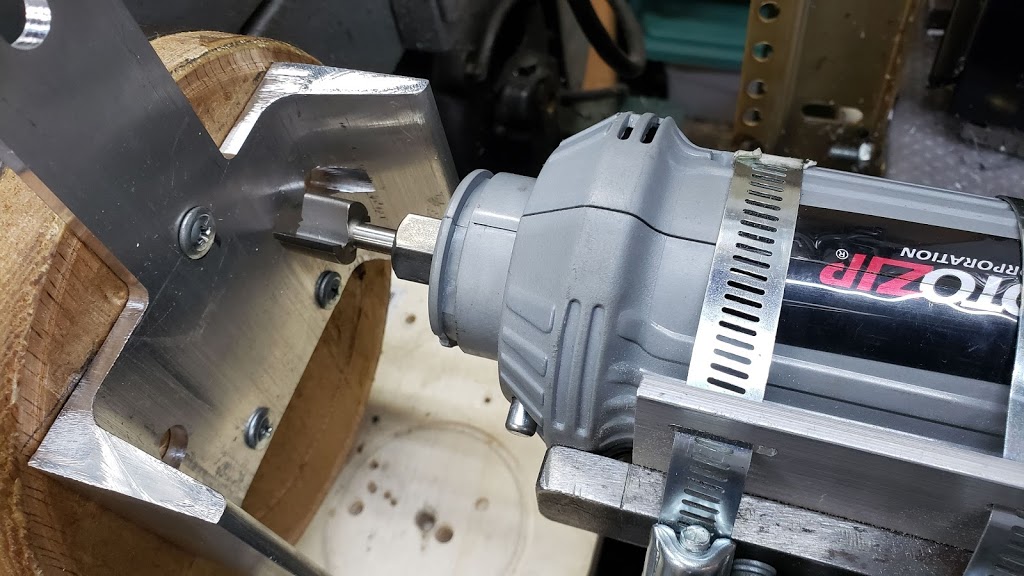
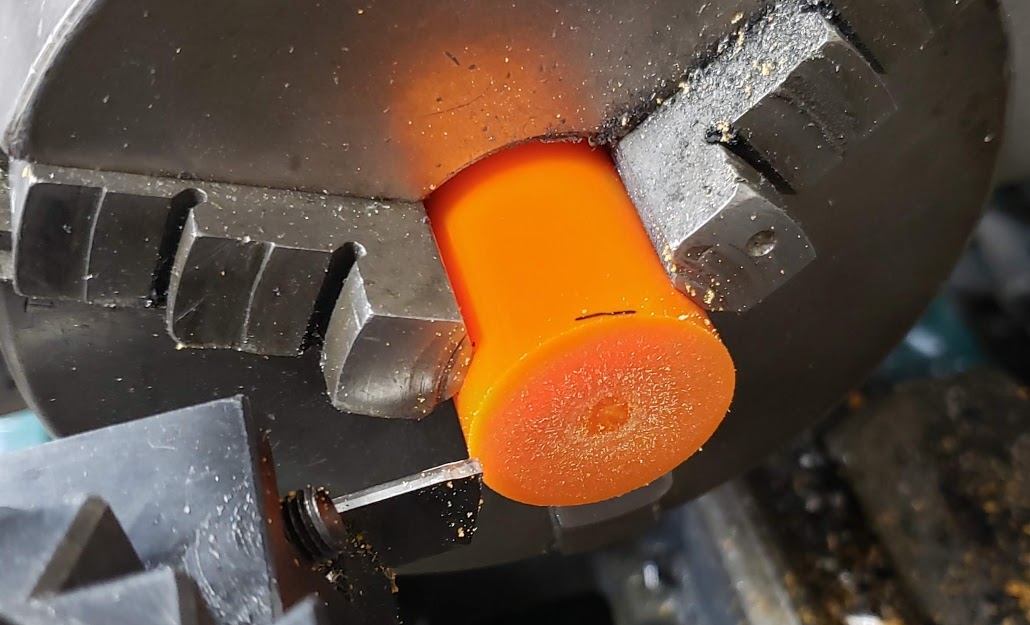
Let's use Delrin, one of our favorite plastics. Made the curved part on the drivewheel of a belt sander, drilled center hole to 0.41" and cut to length on the lathe with a cutoff tool. Machined Delrin smells horrible, but the swarf is magnificent.
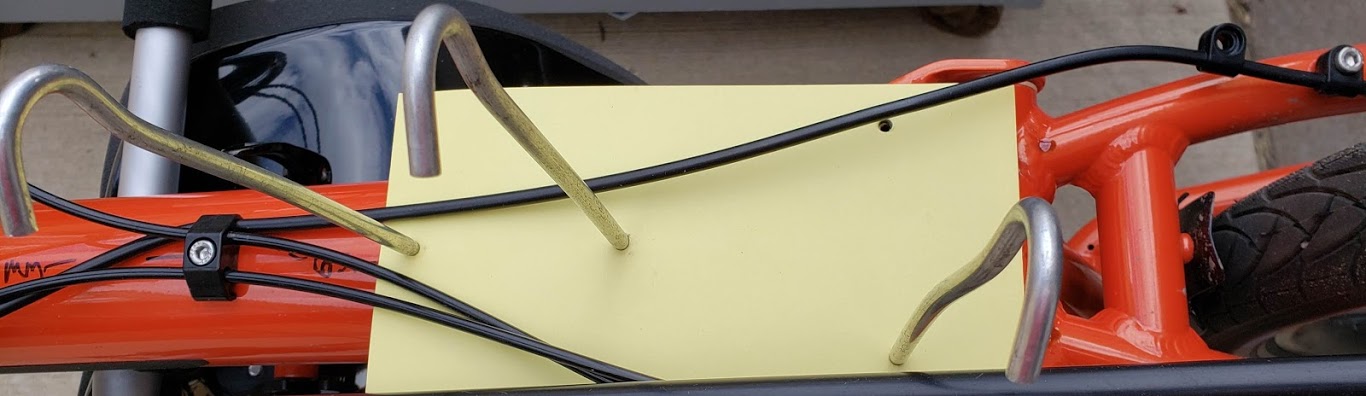
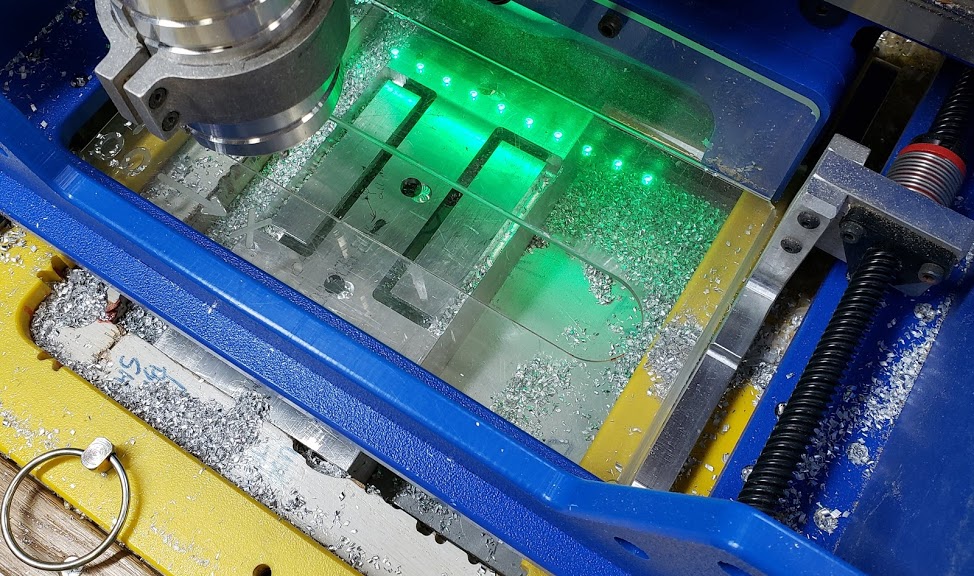
This cheap and easy method for transferring the four screw boss locations to a piece of paper requires several old aluminum tent pegs with 'sharpened' points. This coupled with a digital 6" caliper allows sitting comfortably at a computer when designing the CNC toolpaths to machine the holes. The holes themselves are threaded for M5 screws, but the welded on bosses stick out from the tube. The drainage holes need to be kept clear. Rather than having the rear mounting plate 'float' on top of the bosses, I decided to machine 0.41" clearance holes for these bosses and have the plate fit against the tube itself.
After the laying out the basic design for the rear mounting plate, it's time to begin producing aluminum swarf. Here the five holes (4 mounting, one drainage) have been machined, plus the beginning of the side cutouts of the "U" bar that won't be needed for support. This extra aluminum wouldn't be in the way, but its unecessary weight. The CNC machine is a ShopBot "HandiBot" model, being used by courtesy of JPods, Inc. Cuts are being made by a two flute, upcut 0.25" solid carbide endmill, using light passes. The bit's cutting edge has to move fast enough through the material to prevent friction welding, but not bog down the lightweight router motor. I've had the most success with light passes and slow plunge rates coupled with normal-to-high travel speeds.
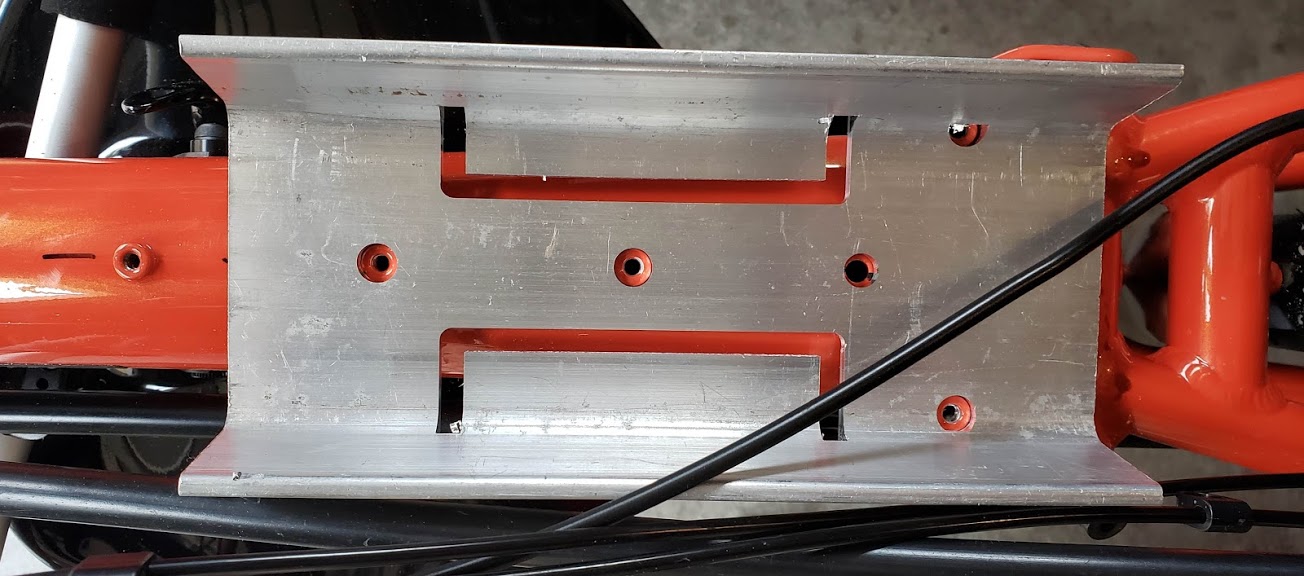
Checking the fit of the freshly machined plate on the bottom of the bike. As Gino says, "Good enough for the government." Some additional machining will be required to provide clearance for the M5 hex head SS screws for the rear two holes, which are by necessity too close to the contoured insides of the U bar. The started side cuts will be finished on the bandsaw.
A poor man's milling machine. Not ideal, but slow hand work with the crossfeed slide on the lathe lets the 3/4" carbide straight bit remove enough metal. Any chatter and the wrong approach will break off a corner of the carbide cutting edge -- don't ask me how I know this. It is, after all, mis-use of a bit made for woodworking. I would have used the CNC but it was quite a reach for the endmills I had on hand.
Return to Top of Page Return to Main Menu
Rear luggage rack made of repurposed deck from a dumpstered "Racktime" rack, aluminum angles, two struts (spars) from an alley find patio umbrella, and some orange 1.25" polymer stock from the parts bin (Thanks Scotty/Ole!). The 'matching' orange color was purely coincidental. The bolt holding the polymer bushing was made from some 5mm shaft stock from a recycled laser printer, with M5 threads tapped on the ends. Stainless steel locknuts hold the shaft in place. The Racktime deck is used front-to-back and upside down to allow for a 'cantilevered' design. Due to this bike's suspension, we can't use the usual rack supports connected to the unsprung rear frame chainstays.
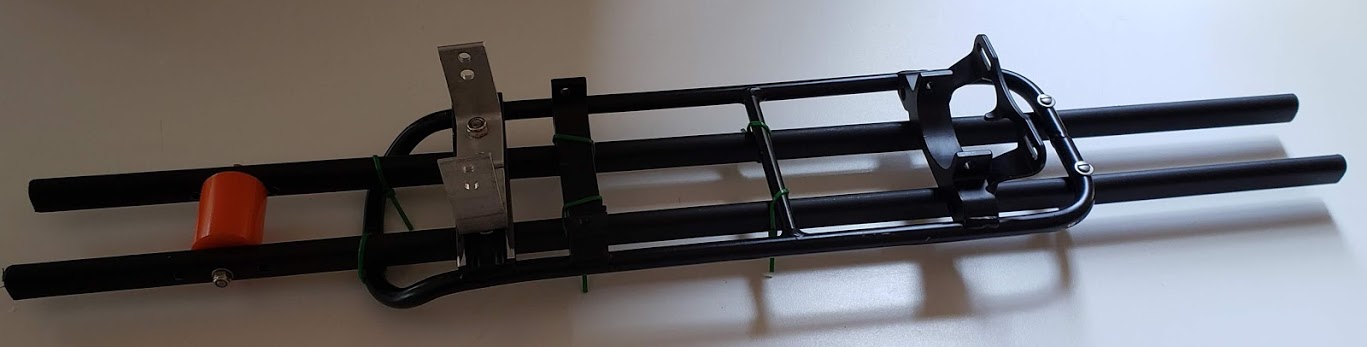
This shows the rack attached to the bike. It is a bit 'up-swept' to provide more clearance between the bottom of the rack and the top of the fender, but this angle works OK and alleviates the need to fasten the pannier bags, since gravity keeps them from going anywhere. The shock cords keep the bags from getting caught in the spokes. Until I get around to putting a light on the back of the rack, it's handy as a helmet-hanger.
This polymer material is some weird stuff -- somewhere between rubber and a plastic. Just barely 'machinable', but it serves this purpose better than the wine bottle cork it replaced.
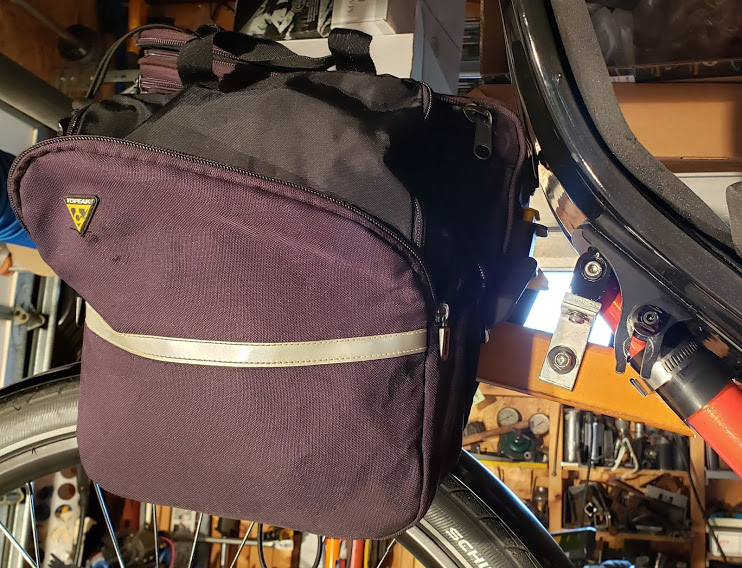
This was the original attempt at a cantilevered luggage rack for Stella. It was basically the same luggage rack used on the eRowbike1, relying on a wooden armrest from a dumpstered lawn chair as the main support spar. The deck was a stock Topeak MTX rail system, which is a really well-engineered product. My original MTX bag has *many* miles on it, but was a bit small for my current needs. They do make a bigger model which DAS uses on her ebike.
Return to Top of Page Return to Main Menu
Stella's cockpit includes the entire space which includes all hand controls and the display area to provide the rider with performance information.
The first attempt at an actual dashboard was installed 15 Jul 2026 and it performed flawlessly during a 14 mile test ride (temp in the 90's and several rain showers, ride with Paul F.).
See more details on the making of the ebrake controls used on Stella.
The original Design & Implementation: Dual thumb lever throttles
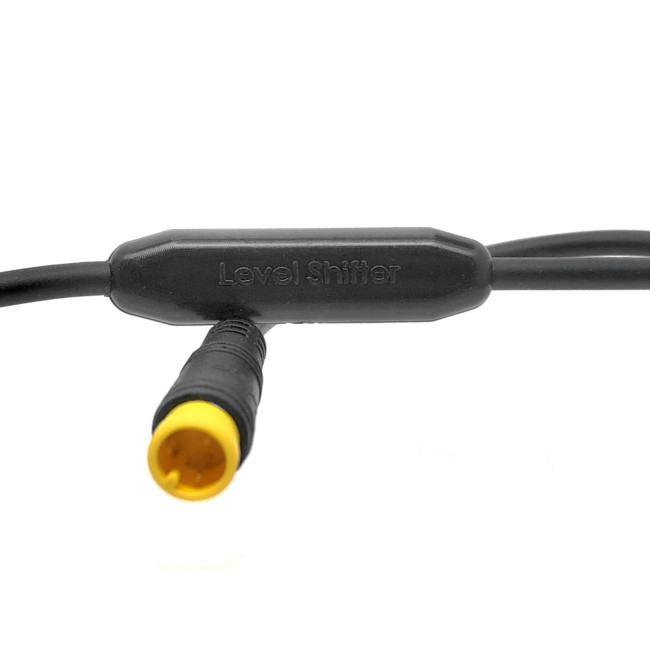
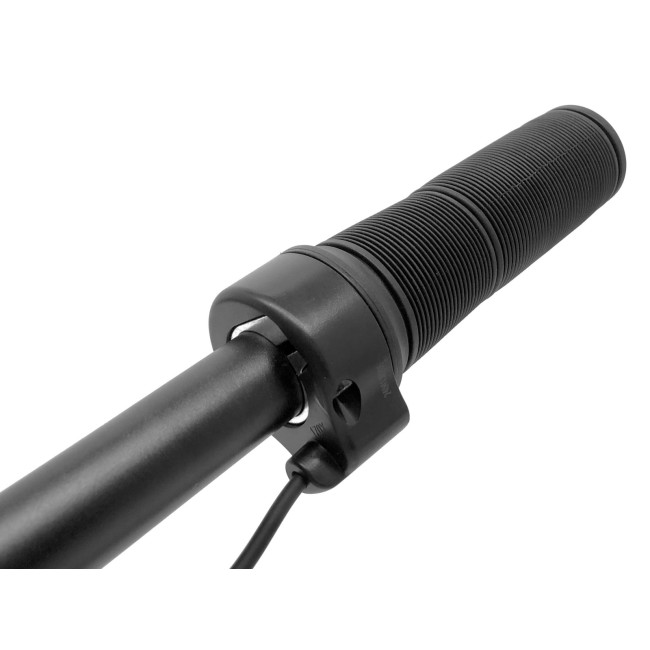
The ultimate goal is to use bi-directional throttles to simplify their use, as well as to make their use safer. Grin now (Apr 2026) carries this bi-directional twist grip throttle. This throttle offers throttling and regenerative braking in one control. Grin has adapted this device with an interface circuit to level shift a 2.5V centered signal to work in the 1-4V acceleration and 0-1V regen range of our systems.
Cable Length: 50 cm
Half-twist throttle format
Right side use - twist back to accelerate, twist forward for regen braking
Sits at 1V in middle position, throttles to 4V and brakes to 0V
Uses 3 pin HiGo style connector
Comes with matching left and right grips
Note, this bidirectional throttle is supported for Superharness or Headless systems. Support for bidirectional throttles with a V3 Cycle Analyst is only in Alpha stage and requires installing CA3.2a25 alpha firmware, in addition to re-terminating the Higo plug to JST. [2-Way Twist Throttle Kit with HiGo MiniB 3 Pin connector. Customized for 1V Signal Offset; $38)]

The voltage level shifter is built into the throttle cable.
An issue to consider, since Stella is running with a V3 Cycle Analyst display (NOT "headless"), is whether I can get it to work with the bi-directional throttle after upgrading my existing CA V3 firmware to the CA3.2a25 alpha firmware. This Grin youtube video (released Apr 2026) shows a great example of the the use of the bi-directional throttle, except it's not paired with the CA V3 display in that use case.
I downloaded all of the available CA V3 firmware upgrades from Grin on 12 Apr 2026 [Firmware downloads are now complete: CA3-2a26.zip, CA3-1a810S.zip, CA3-1a13E.zip, CA3-1a19XS.zip, CA3-13xf1.zip, CA3-13xf2.zip, CA3-13a11S.zip, CA3-13v15.zip, CA3-13v25.zip]. I'm guessing that CA3-2a26 might be the latest in the "CA3-2a*" series.
August 2023: finally got around to installing the high intensity 'bird chirp' warning device.
Bell (finally installed nice brass bell on left handlebar, Spring 2026),
AirZound Air Horn (not installed)
This will not be used -- after multiple years of riding, it just doesn't seem necessary. The Phaserunner controller needs to be exposed to air flow, so it's fine attached to the front boom tube.
Return to Top of Page Return to Main Menu